| Author |
Message |
Blakey

Joined: Sun Mar 04, 2012 6:11 pm Posts: 464 Location: Brisbane, Petire
Vehicle: Jimny 3"lift Flares 31's

|
 Posted: Mon Sep 24, 2012 9:51 pm |
|
I put a EL falcon Alternator in my Jimny so i thought id let everyone know how. This instructions are ONLY for a 2005+ Jimny models, This Mod will work for a Non-VVT 2004 back but may require different wiring and spacers, as the mounts and fuse box are different. First thing you need is A Jimny if you don't have one go buy one don't like them to bad you now want one. I removed a lot to get access into the area things i removed where the Radiator, the vacuum advance thingy moved the Fuse box out of the way to paint under the battery tray as mine was pretty rusted up and a few other things Next you need the Alternator. it is an EL falcon 110A Mitsubishi Alternator. they look like this and can be bought on ebay for about $180 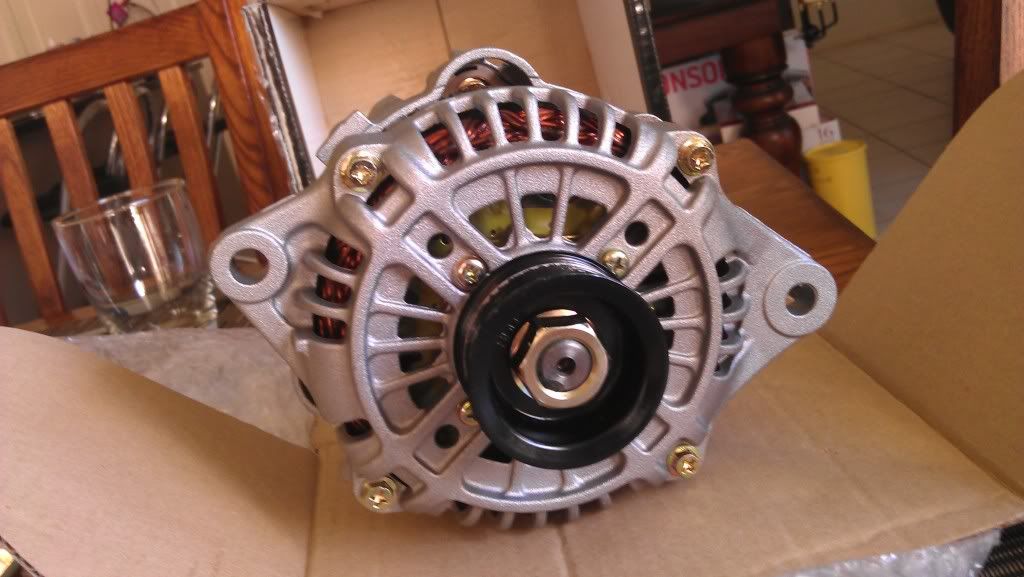 you will also need some spacers. because of the different mount. i worked out the original alt was 58mm mount to mount (on the engine) on the inside and the new alt was 65mm approx mount to mount (on the Alt) on the inside. so drawing it up on a piece of paper it came out to need a 7mm spacer for the rear engine mount to the new alt mount. and an approx 44.5mm spacer for the inside of the new alt mount to the rear alt engine mount. 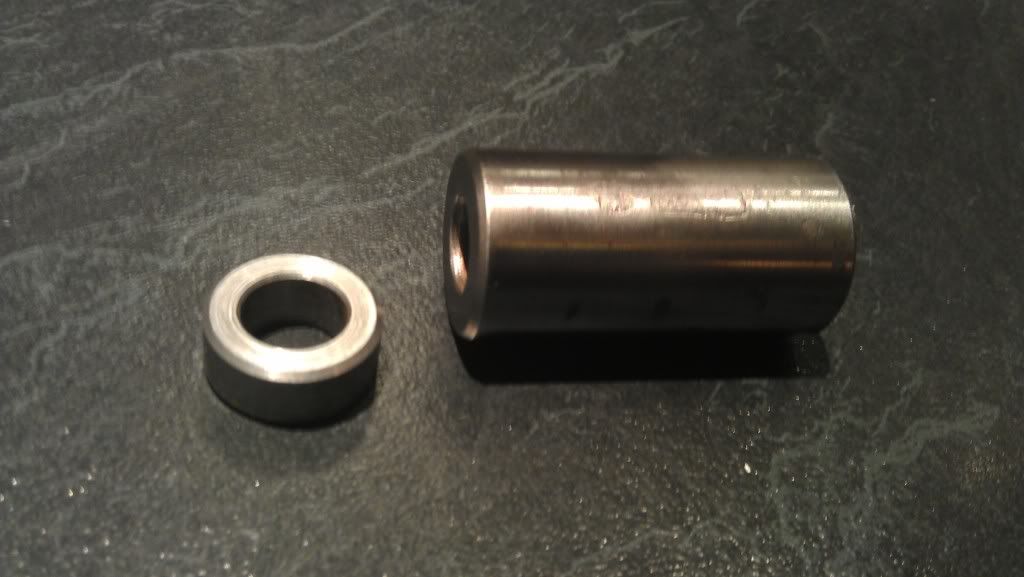 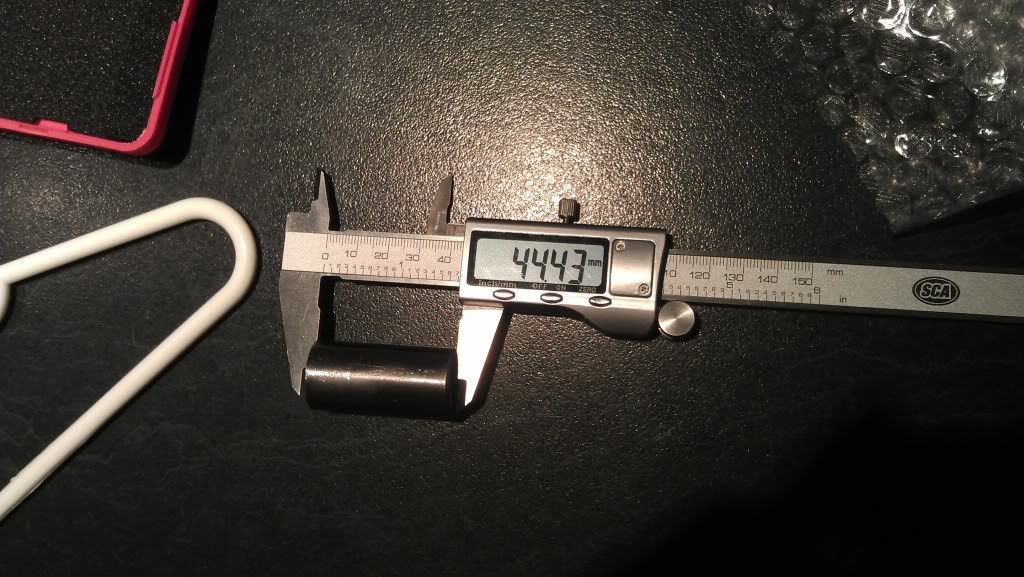 now because the new alts mount is larger you will also need new bolts for both top and bottom. the bottom bolt needs to be a M10 120mm bolt. and a M8 35mm bolt for the top, the top also need a nut and some washers. the bottom also needs some washers but no need for a Nut as the new alt has a captive nut on it. all bolts will need to be 8.8 tensile bolts or equiv 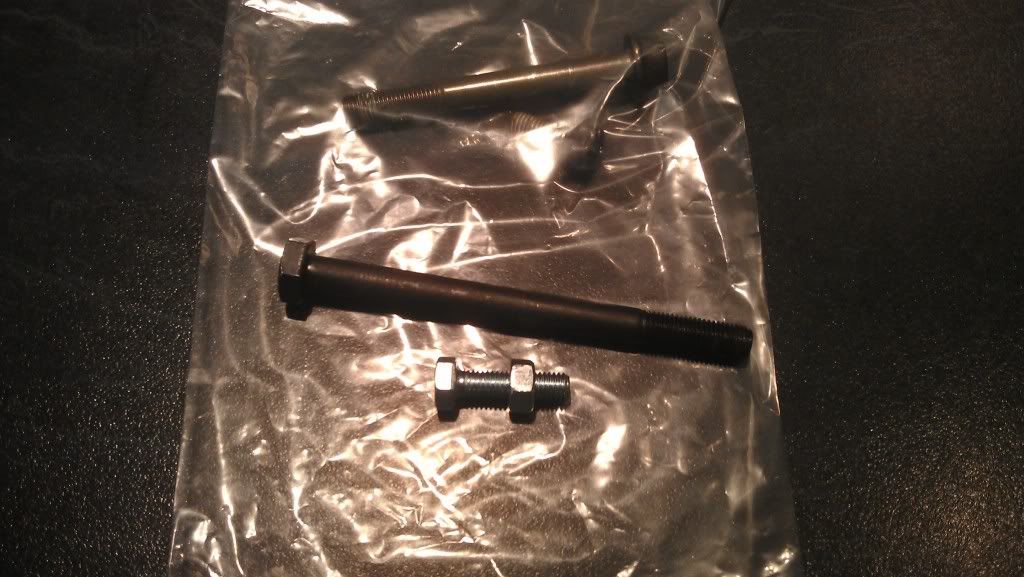 now the old alternators engine mounts, the rear mount will need to be removed so you can drill out the M10 thread. 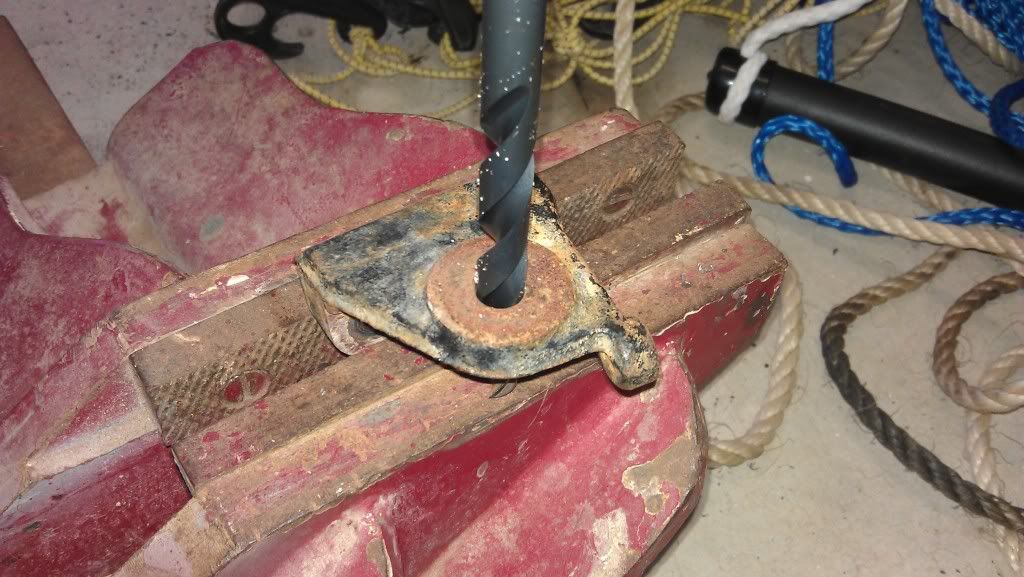 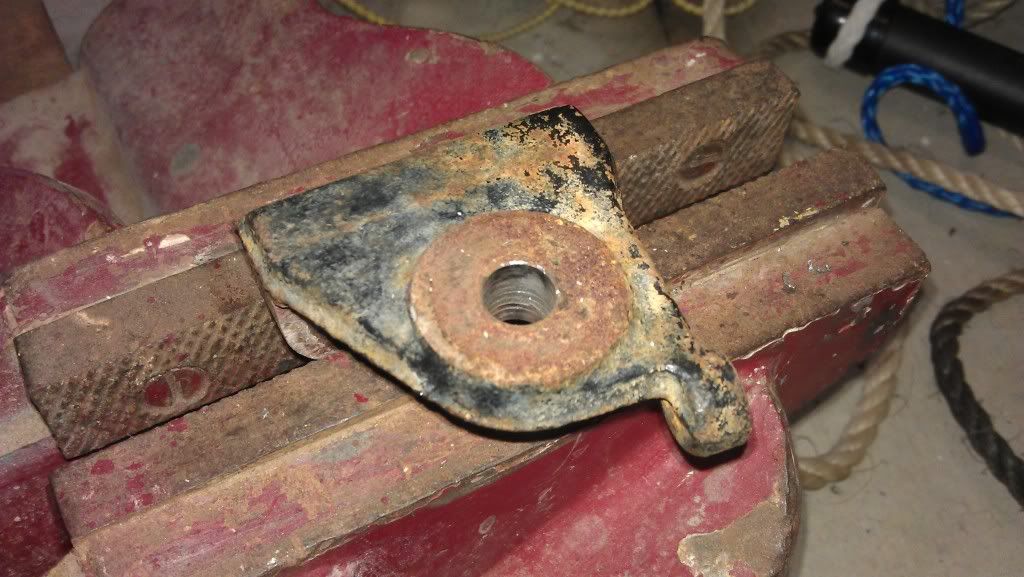 once you have drilled out the mount it can be replaced and bolted back up. once that is done you can mount the Alt into the all important Jimny shown here 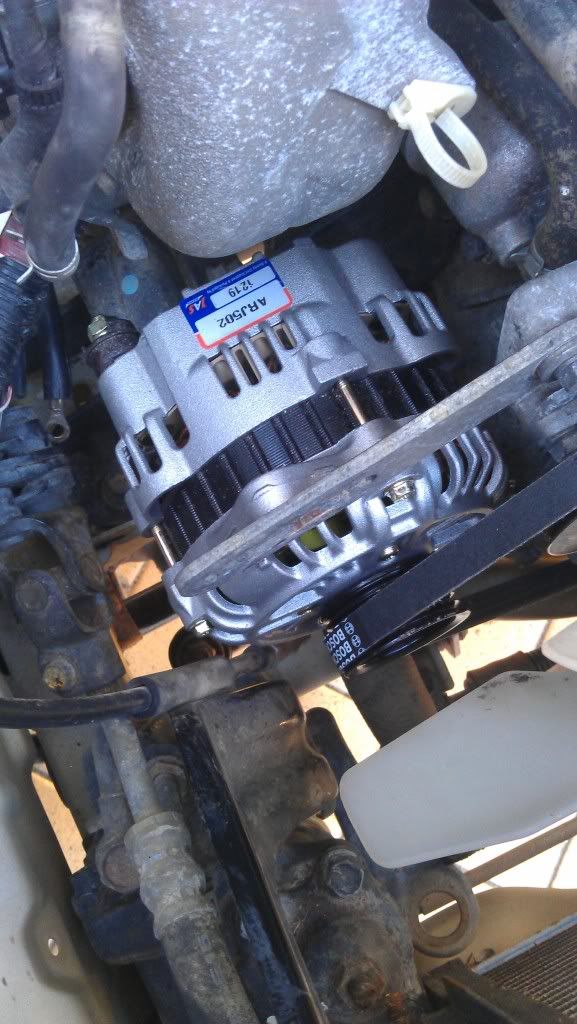 Now for the Belt, The Belt needed is a Micro V/ Multi V belt. and a 4pk belt is required the size needed is a 860mm. sorry forgot to get a pic of the belt before i put it in but here is a random one with the belt size 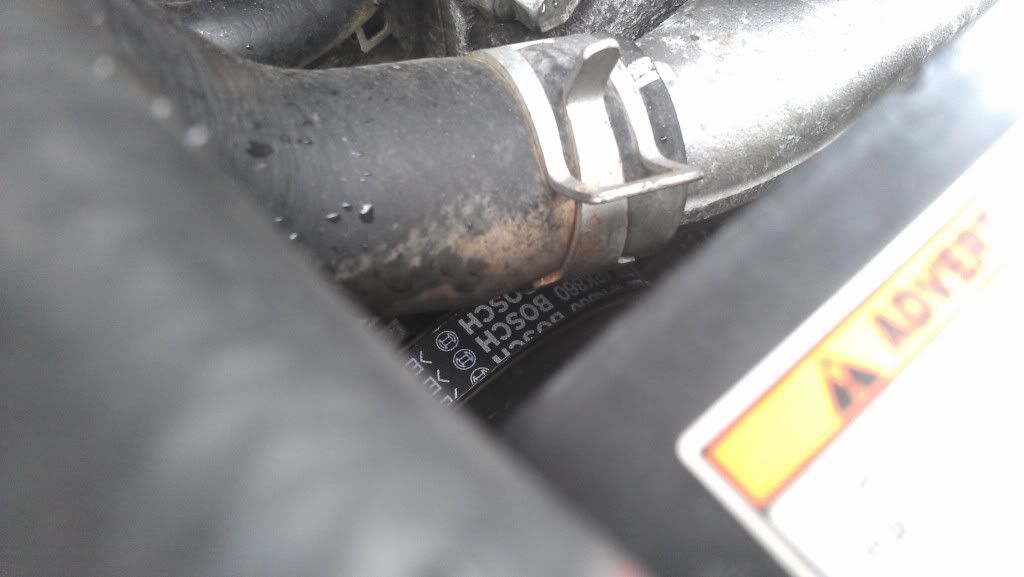 once its in and bolted up with the belt installed. you will need to start doing the electrical side of it the old sense and light connector will need to be cut off and if you got one the connector for the Falcon alt put on (i didn't have one so i improvised) i used just female blade lugs they fit perfectly onto the connectors in the alt (this will also need to be waterproofed) silicon or something i haven't done anything on it yet as i haven't decided on what to use. you will be better off finding the clip. if i find a place that sells them i will add it here. As you can see here the white red is the light and black white is the sense, if you mix these up you will over charge your system and kill all your electrics over time and more importantly the light will not work. 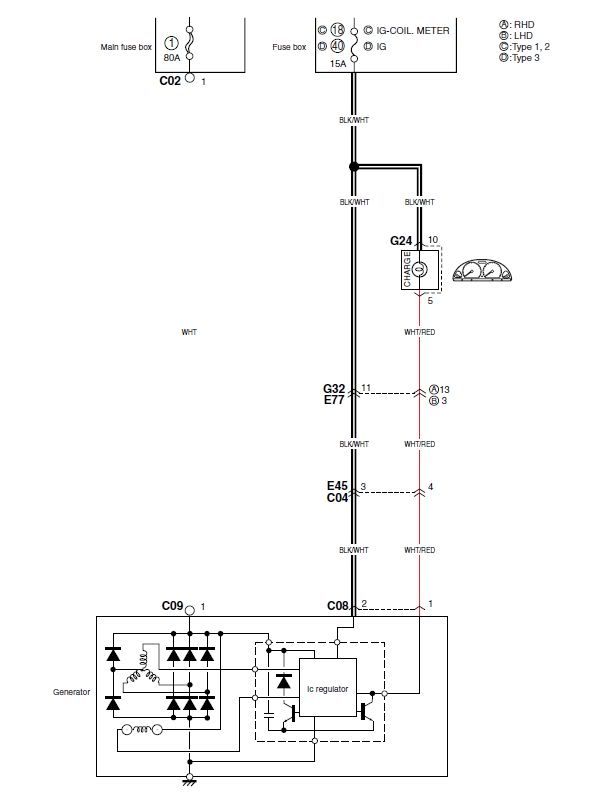 The New Alternator connections are with the charging post facing up the sense is the left pin and the light is the right pin 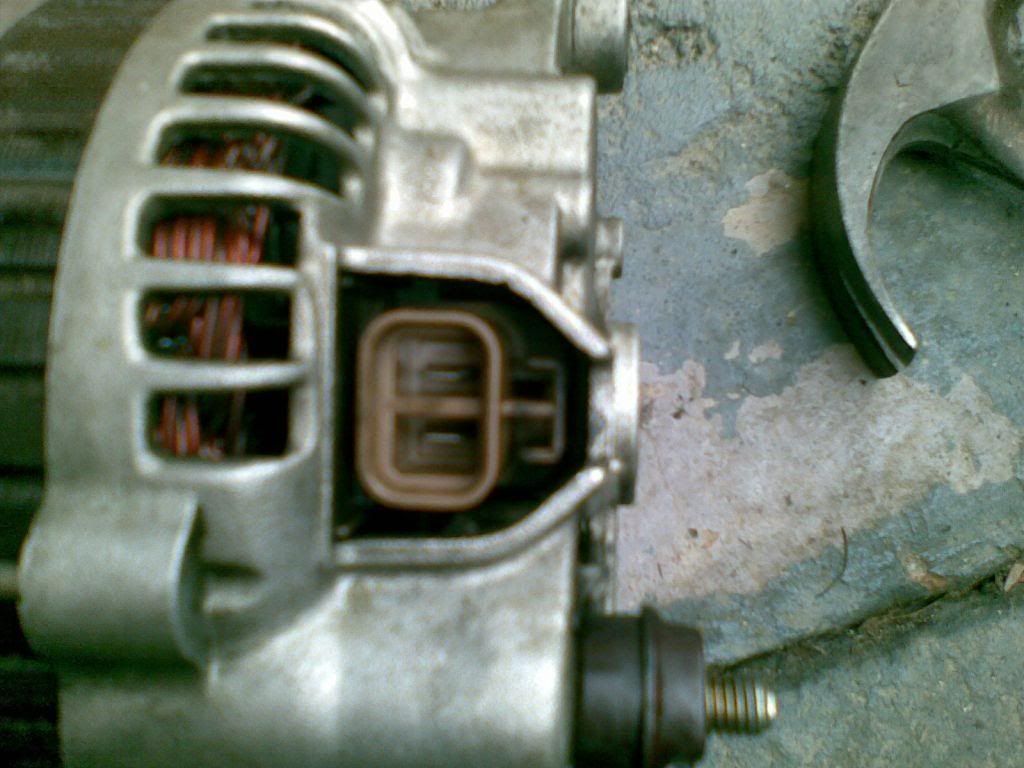 Once the small connections are all sorted you will need to connect your charge cable. (the Big one) i went a bit over the top with this and used 32.5mm^2 cable but you can use 25mm^2 if you wanted. Now the old wiring can be removed or cut and capped. but when finding the cable you might find it goes to several places. once you take the cable off the battery post. shown here its the left hand cables 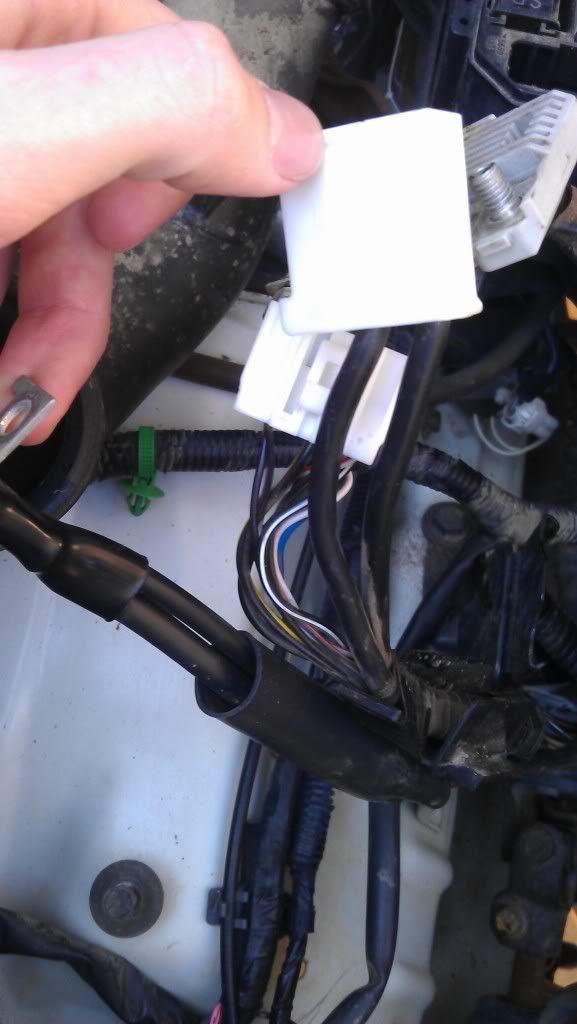 the Larger of the Cables is the OLD alt cable and the smaller one is multiplied in the harness to go to the white connecter on the right. connection is shown here ( i fully removed the engine harness its a hassle and i recommend not doing it) that cable will need to be reconnected with your new alt --> battery cable. before the Fuse as it was originally. I.E. the alt side of the fuse will have 2 cables on it, the new alt cable and the smaller of the 2 original cables from the cables on the left of the previous picture. 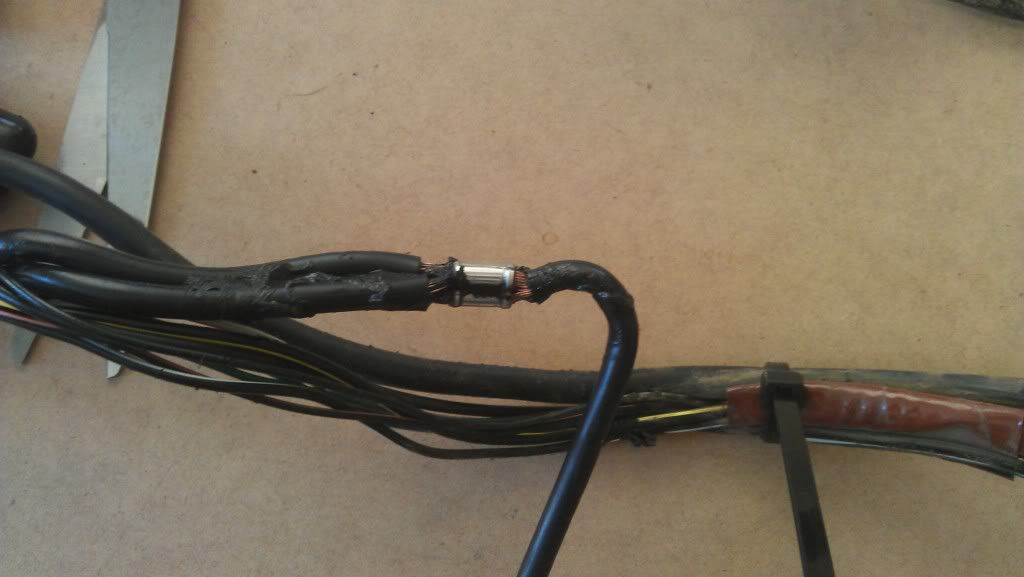 The other part of the battery post can be unbolted and the plastic fuse part can be removed and thrown away 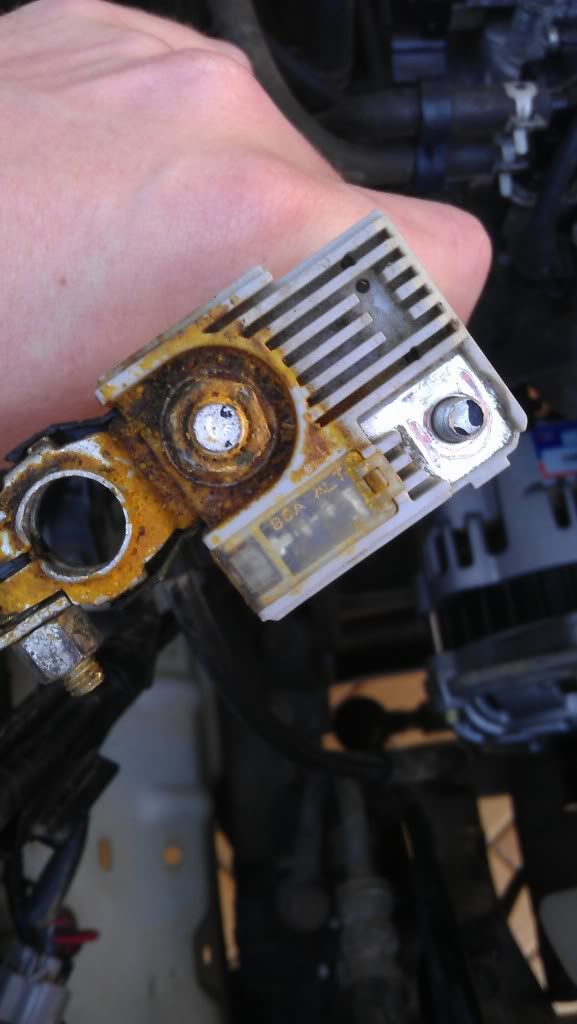 but keep the old battery connectors if you don't have a replacement for the stock battery (Japanese terminal posts) Now the lugs will need to pretty much all be 8mm bolt hole lugs depending on the fuse and battery connectors you get and to crimp them you need to have a mate with a strong grip or you can go on Ebay and purchase one of these for about $100 16Ton hydraulic crimp set. or if you live near me you can come use it. 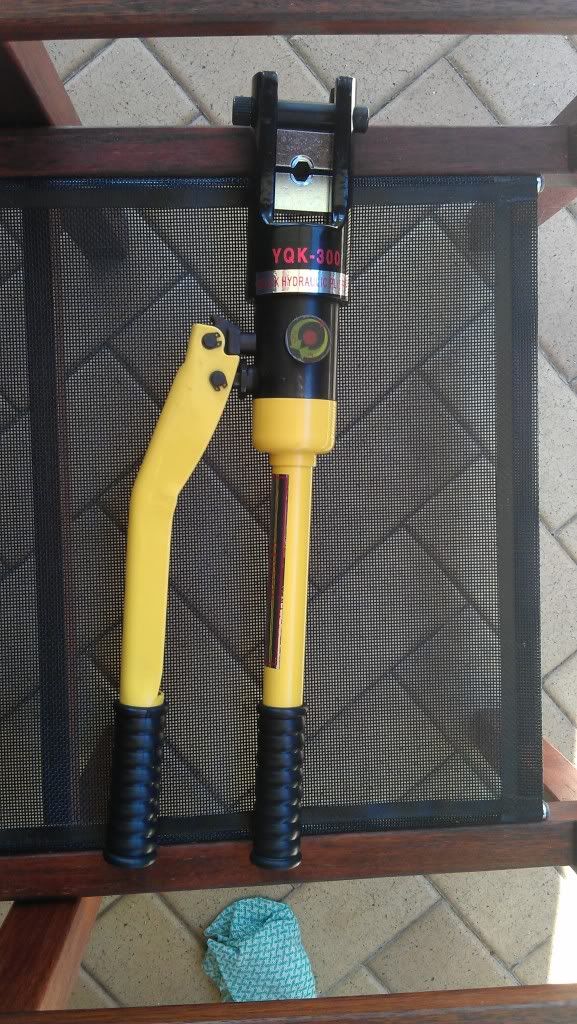 it can crimp like this 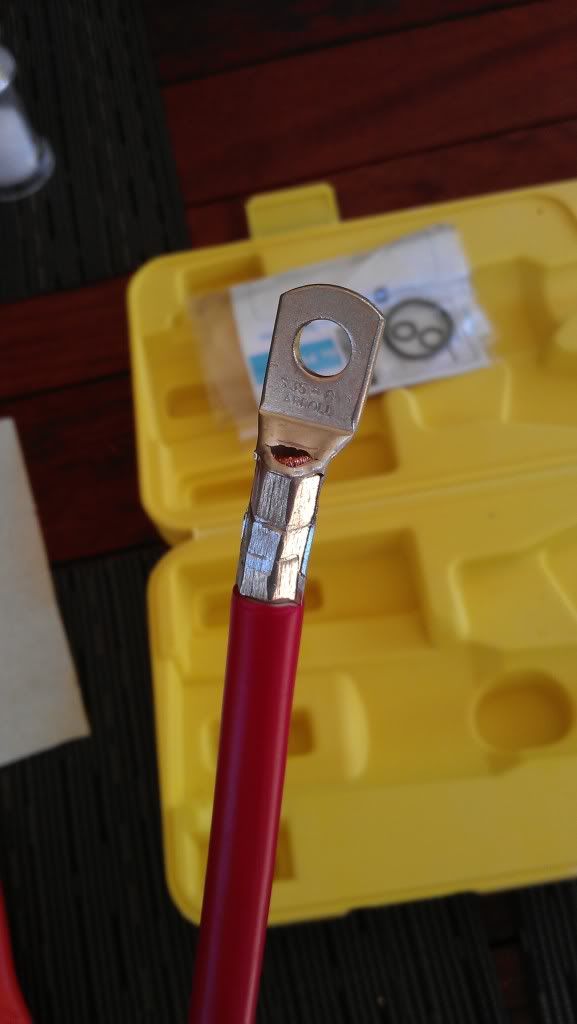 seeing as your Alt can now push out 110A you will need a larger fuse i went for a 125A Fuse it just bolts in with 8mm bolts 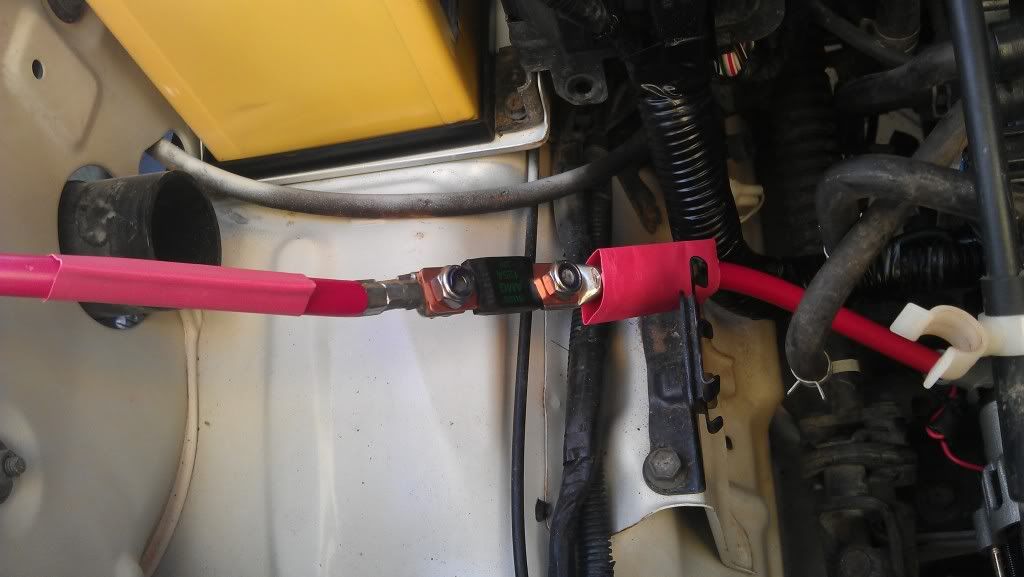 here is the alt connected fully the Alternators charging bolt is an 8mm bolt so it will need an 8mm lug. 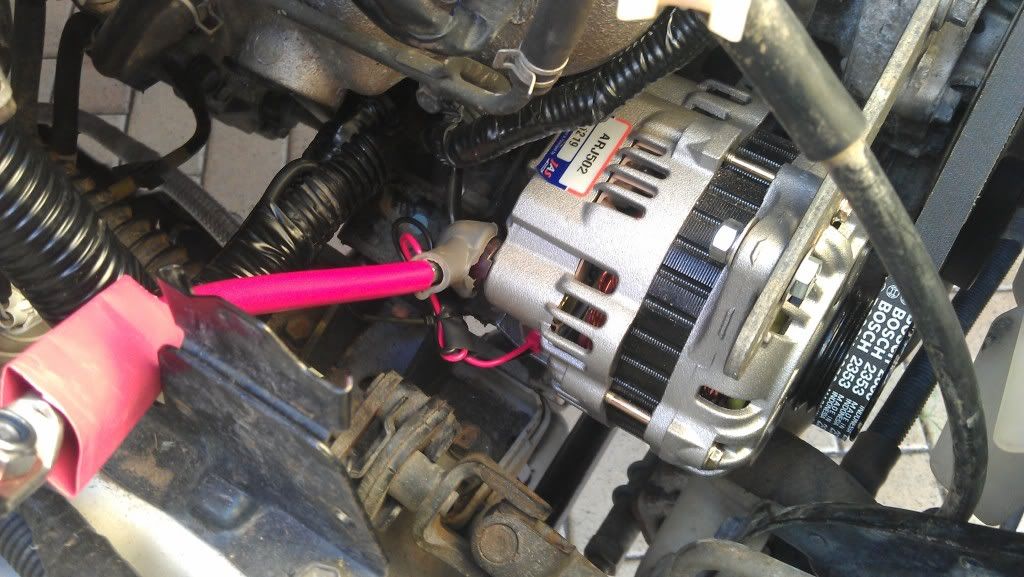 once that's done start connecting the battery back up as the not touched cable lug was quite dirty i cleaned it up before putting it back on the battery  once every thing is connected again put what every you removed to get access back together and connect up fully the battery. then start and see if you did it right. Some Finished Pictures 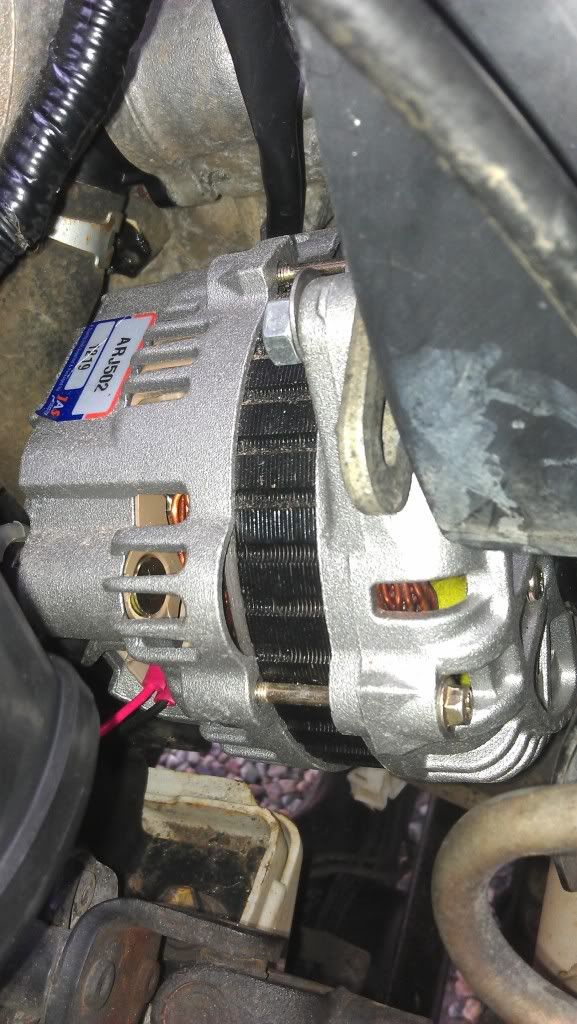 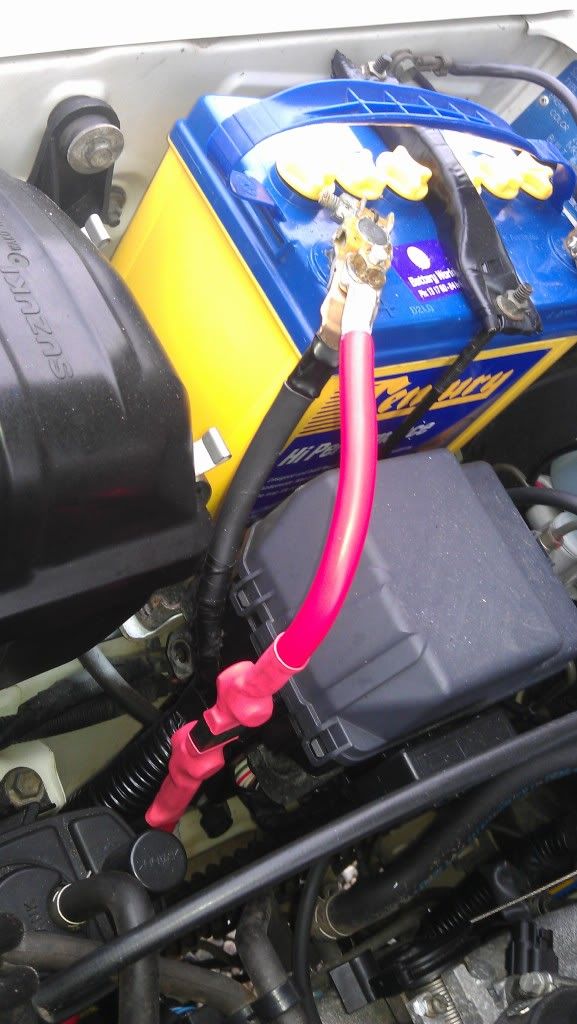 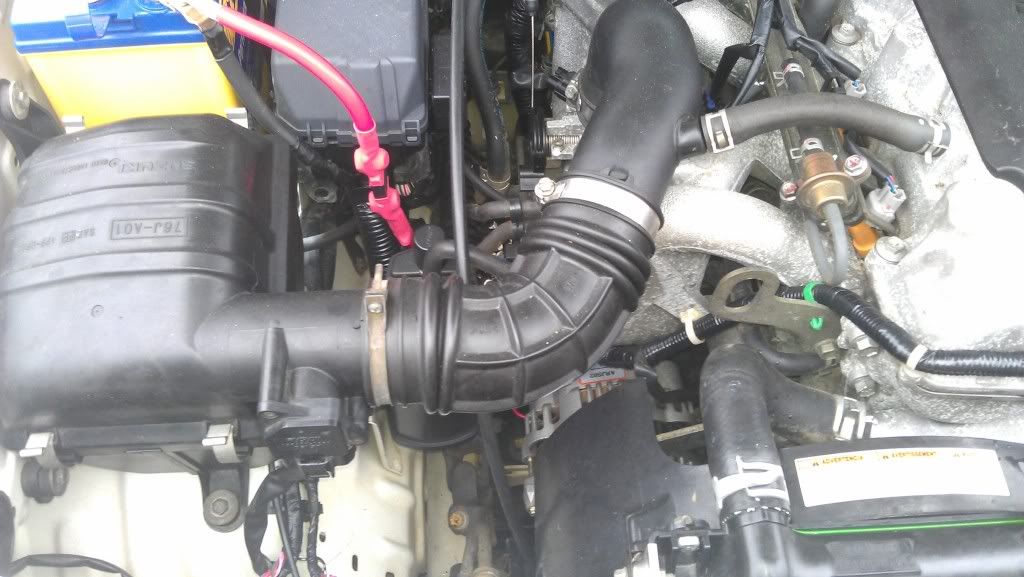 IMPORTANT!! IMPORTANT!! Check your Alternators Charging voltage. I had around 14.4V output which is acceptable ( but i could have a slightly high resistance in the sense cable) IF IT IS HIGHER THEN 14.8V to 15+ Check your sense cable is correct check the fuse is not blown and check that it doesn't have a overly high resistance making the alt see a small voltage as it will pretty much up the voltage output till your battery boils over and possibly kill your ECU and other electrics. I maintain no responsibility if this happens do this modification at your own risk
Last edited by Blakey on Tue Mar 26, 2013 12:15 pm, edited 7 times in total.
|
|
|
|
|
stockman
az supporter

Joined: Thu Nov 05, 2009 10:30 pm Posts: 5319 Location: Canberra
Vehicle: 4wd
|
Posted: Mon Sep 24, 2012 9:54 pm |
|
|
:goodtech:
_________________
Watch out or you'll get sued.
|
|
|
|
|
atari4x4
az supporter

Joined: Mon Dec 11, 2006 10:30 pm Posts: 34843 Location: East Radelayed
Vehicle: SV420+SV620 Vitara's
|
Posted: Mon Sep 24, 2012 9:59 pm |
|
|
+1 to :goodtech:
and i'd like to dedicate this one to bigdogdazza, who managed to fry his electrical's when doing the upgrade
_________________
You're just hating because you don't understand
|
|
|
|
|
Scales
az supporter

Joined: Mon May 30, 2011 9:28 am Posts: 2233 Location: Townsville
Vehicle: 03 Jim M13A no-vvt, Vinyl Spec
|
Posted: Tue Sep 25, 2012 9:16 am |
|
|
Damn good writeup, been waiting for someone to do a goodtech for the later model donk. Anyone know if this would fit a non-vvt?
|
|
|
|
|
dougies_tx5turbo

Joined: Tue May 25, 2010 10:56 am Posts: 1051 Location: north brisbane
|
Posted: Wed Sep 26, 2012 9:28 pm |
|
|
That's awesome that you did the EL alt conversion, hopefully I will be doing this when I do my motor conversion. Maybe will take you up on your offer about the crimping tool
|
|
|
|
|
zukenutter
az supporter

Joined: Sun Feb 08, 2009 10:30 pm Posts: 9045 Location: Brisneyland
Vehicle: 2006 Jimny JLX
|
Posted: Thu Sep 27, 2012 7:56 am |
|
Great writeup thanks. Scales wrote: Damn good writeup, been waiting for someone to do a goodtech for the later model donk. Anyone know if this would fit a non-vvt? Pretty sure they'd be the same
_________________
Click WWW below for STICKERS
|
|
|
|
|
Blakey
Joined: Sun Mar 04, 2012 6:11 pm Posts: 464 Location: Brisbane, Petire
Vehicle: Jimny 3"lift Flares 31's
|
Posted: Fri Sep 28, 2012 5:03 pm |
|
dougies_tx5turbo wrote: That's awesome that you did the EL alt conversion, hopefully I will be doing this when I do my motor conversion. Maybe will take you up on your offer about the crimping tool that's no problem at all takes about 20sec to crimp only hard part is trying to do it by yourself as its difficult to pump it and hold the lug your crimping in the right place. also as zukenutter said it should be the same for any M13A engined Jimny
Last edited by Blakey on Mon Oct 15, 2012 6:49 am, edited 1 time in total.
|
|
|
|
|
Blakey
Joined: Sun Mar 04, 2012 6:11 pm Posts: 464 Location: Brisbane, Petire
Vehicle: Jimny 3"lift Flares 31's
|
Posted: Wed Oct 03, 2012 11:46 pm |
|
|
Iv added a bit about pre 2005 Jimnys, main difference is the different fuse box and main cables as it seems your main fuse is in the fuse box rather then external on the battery connector. if anyone has any pictures showing your cables and fuse box post them up and ill add them to the writeup. as i cant be sure what you have to do for your main cables with out seeing it.
|
|
|
|
|
Scales
az supporter
Joined: Mon May 30, 2011 9:28 am Posts: 2233 Location: Townsville
Vehicle: 03 Jim M13A no-vvt, Vinyl Spec
|
Posted: Mon Oct 15, 2012 5:45 am |
|
|
does anyone know if the EB falcon alternator is the same as the EL?
|
|
|
|
|
Blakey
Joined: Sun Mar 04, 2012 6:11 pm Posts: 464 Location: Brisbane, Petire
Vehicle: Jimny 3"lift Flares 31's
|
Posted: Mon Oct 15, 2012 6:56 am |
|
|
no idea sorry. do they look similar?
|
|
|
|
|
Scales
az supporter
Joined: Mon May 30, 2011 9:28 am Posts: 2233 Location: Townsville
Vehicle: 03 Jim M13A no-vvt, Vinyl Spec
|
Posted: Mon Oct 15, 2012 7:51 am |
|
|
lol no idea yet, my mate has a busted-ass EB he's getting rid of but it has a brand new alt in it he said i could have.
|
|
|
|
|
Blakey
Joined: Sun Mar 04, 2012 6:11 pm Posts: 464 Location: Brisbane, Petire
Vehicle: Jimny 3"lift Flares 31's
|
Posted: Mon Oct 15, 2012 12:02 pm |
|
Scales wrote: lol no idea yet, my mate has a busted-ass EB he's getting rid of but it has a brand new alt in it he said i could have. if its free id probably just get it anyway if its wrong you can always sell it to someone with an EB falcon
|
|
|
|
|
Scales
az supporter
Joined: Mon May 30, 2011 9:28 am Posts: 2233 Location: Townsville
Vehicle: 03 Jim M13A no-vvt, Vinyl Spec
|
Posted: Mon Oct 15, 2012 3:16 pm |
|
Blakey wrote:
if its free id probably just get it anyway if its wrong you can always sell it to someone with an EB falcon
Yeah that was the plan, was just seeing if anyone knew straight up. as for selling it, I dont know anyone who bat's for the other team so might be hard to sell. 
|
|
|
|
|
Jazzor
az supporter

Joined: Sat Jul 24, 2010 4:42 pm Posts: 502 Location: Kingston, Tas
Vehicle: 85 Suzuki Sierra
|
Posted: Sun Oct 28, 2012 11:57 pm |
|
|
What did you do about the adjuster/slide piece of metal that goes to the top bolt?, as the EL alternator requires a larger diameter bolt than the original one. Just cut the track in it wider?. Cheers!
_________________ Orange LWB Sierra
|
|
|
|
|
Blakey
Joined: Sun Mar 04, 2012 6:11 pm Posts: 464 Location: Brisbane, Petire
Vehicle: Jimny 3"lift Flares 31's
|
Posted: Mon Oct 29, 2012 8:36 am |
|
Jazzor wrote: What did you do about the adjuster/slide piece of metal that goes to the top bolt?, as the EL alternator requires a larger diameter bolt than the original one. Just cut the track in it wider?. Cheers! just used the smaller bolt with some HT washers. if you dont like that you will need to drill out the slide to be larger. washers are easyer.
|
|
|
|
|
Jazzor
az supporter
Joined: Sat Jul 24, 2010 4:42 pm Posts: 502 Location: Kingston, Tas
Vehicle: 85 Suzuki Sierra
|
Posted: Mon Oct 29, 2012 9:48 pm |
|
Roger, well I have done it to a non-vvt engine (2002 M13a) and it worked fine. Rereading this I should upgrade my fuse to a 120A one asap, I just left all my original sierra/jimny loom as it was. The stock + cable leaving the alternator was the same size as the falcon wiring I got with the alternator so I figure it should be alright. I got the correct plug with it too which was handy. I did the bottom mount only using one spacer made up from washers, I don't think you need a spacer in the other section. And I also got away with using the original belt. It was a tight fit to get on but the alternator actually had a bit of movement that required tightening up once it was on. Here is a bottom mount pic: 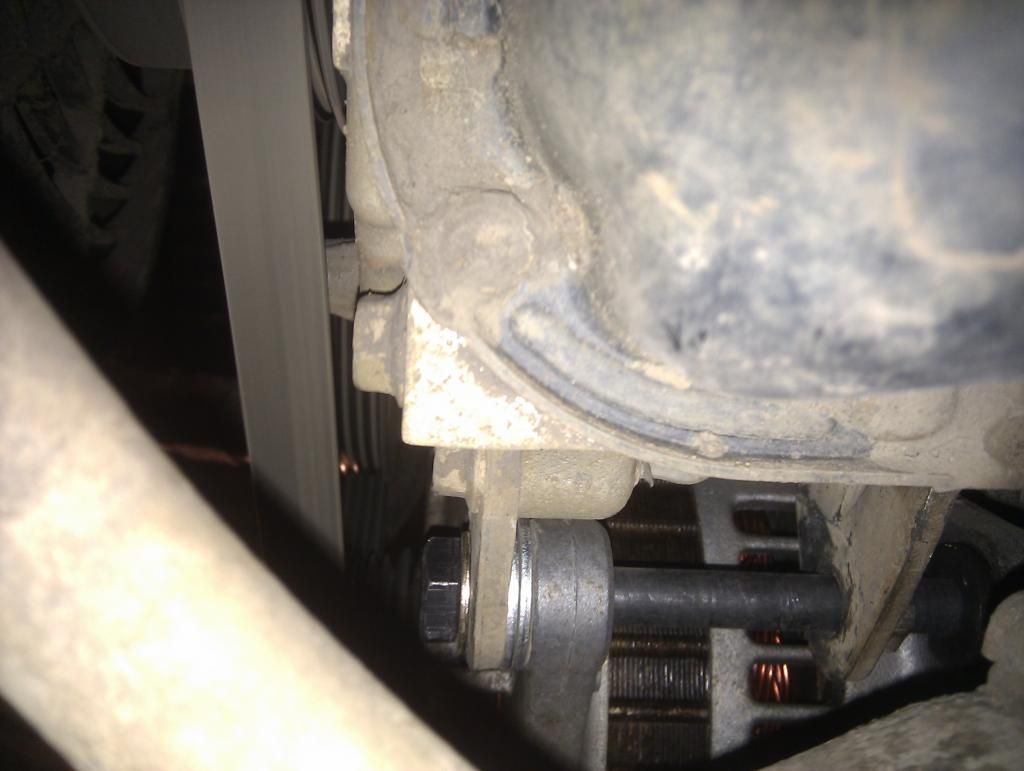 Cheers for the bolt info!, I think the guy at the shop gave me with wrong bottom bolt first though as the thread wasn't fine enough. The thread on the alternator is the same as the thread on the rear bracket before you drill it out. So that was a good test so I didn't have to take the alternator to the shop to test the new bolt thread on. Cheers!  I will post some more pics in my buildup thread when I get a chance. _________________ Orange LWB Sierra
|
|
|
|
|
Blakey
Joined: Sun Mar 04, 2012 6:11 pm Posts: 464 Location: Brisbane, Petire
Vehicle: Jimny 3"lift Flares 31's
|
Posted: Mon Oct 29, 2012 10:02 pm |
|
|
That doesn't look very secure on your bottom bolt as only the front part of the mount is actually holding anything that's the point of the spacer so there is something solid between the original mounts and the new alt mounts and the original belt even mashing the alternator against the block the belt would never fit the non vvt m13a must be different. And your bottom mounts are different as well. Buy looking at them they look to be bent steel rather then cast brackets of the vvt
|
|
|
|
|
Jazzor
az supporter
Joined: Sat Jul 24, 2010 4:42 pm Posts: 502 Location: Kingston, Tas
Vehicle: 85 Suzuki Sierra
|
Posted: Mon Oct 29, 2012 11:38 pm |
|
Yea they are bent metal, good eyes!. Perhaps the thread is different, I can't be sure if i got the wrong one or not then... The belt was a pretty tight fit to get on, it didn't look like it would but spinning the alternator with a socket and holding some tension on it worked, I just wanted to test it even if the alternator was hard up on the engine but it worked out fine. I can see another spacer would provide a bit more security if it was a perfect fit to hold tension on the rear mount. I'll report back if it falls off . _________________ Orange LWB Sierra
|
|
|
|
|
Blakey
Joined: Sun Mar 04, 2012 6:11 pm Posts: 464 Location: Brisbane, Petire
Vehicle: Jimny 3"lift Flares 31's
|
Posted: Tue Oct 30, 2012 12:18 pm |
|
Jazzor wrote: Yea they are bent metal, good eyes!. Perhaps the thread is different, I can't be sure if i got the wrong one or not then... The belt was a pretty tight fit to get on, it didn't look like it would but spinning the alternator with a socket and holding some tension on it worked, I just wanted to test it even if the alternator was hard up on the engine but it worked out fine. I can see another spacer would provide a bit more security if it was a perfect fit to hold tension on the rear mount. I'll report back if it falls off . i dont think your engine will be in good shape if it falls off wile its running haha. im supprised so much has changed between the VVT and the non VVT. are you sure you have the M13A engine?
|
|
|
|
|
Jazzor
az supporter
Joined: Sat Jul 24, 2010 4:42 pm Posts: 502 Location: Kingston, Tas
Vehicle: 85 Suzuki Sierra
|
Posted: Tue Oct 30, 2012 12:27 pm |
|
I'm 101% sure on that one . More pics in my buildup thread now too. _________________ Orange LWB Sierra
|
|
|
|
|
Scales
az supporter
Joined: Mon May 30, 2011 9:28 am Posts: 2233 Location: Townsville
Vehicle: 03 Jim M13A no-vvt, Vinyl Spec
|
Posted: Mon Mar 25, 2013 11:52 pm |
|
Well I got a hold of this little beasty from my mates old falcon. dunno what year/model. think its an EA/EB? I dunno these things at all... you blokes rekon it will fit the Jimny? Its a non-vvt m13a. Blakey, any reason you say ONLY 2005+ VVT etc? you imply to know why it wont fit a non-vvt.... 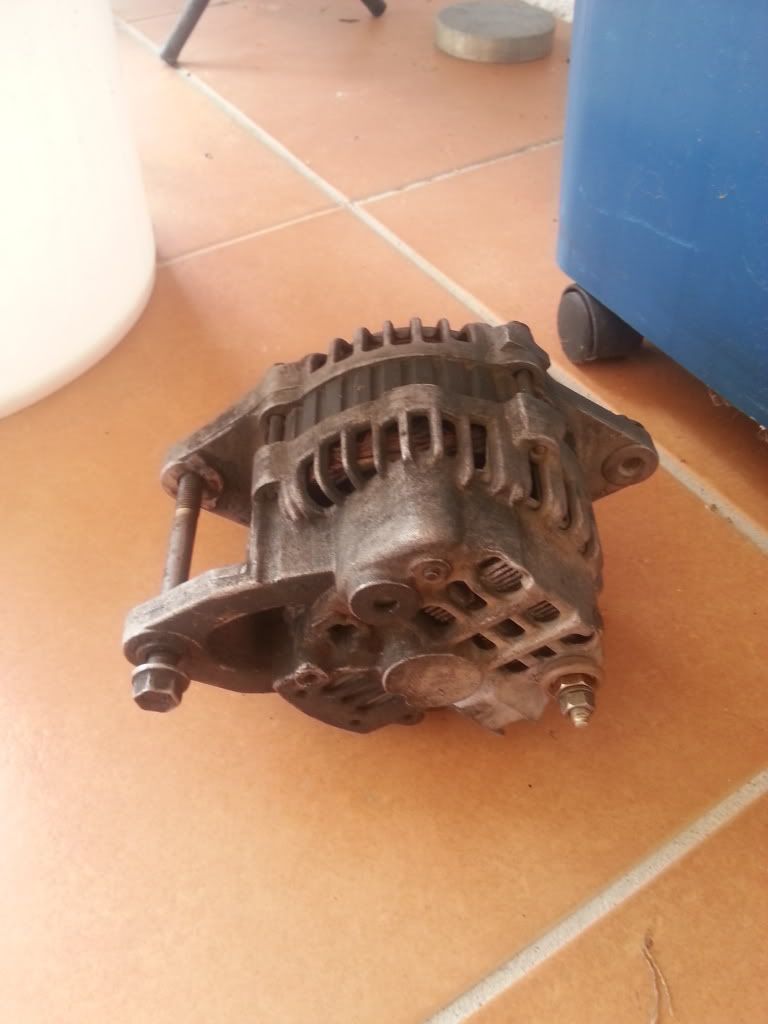 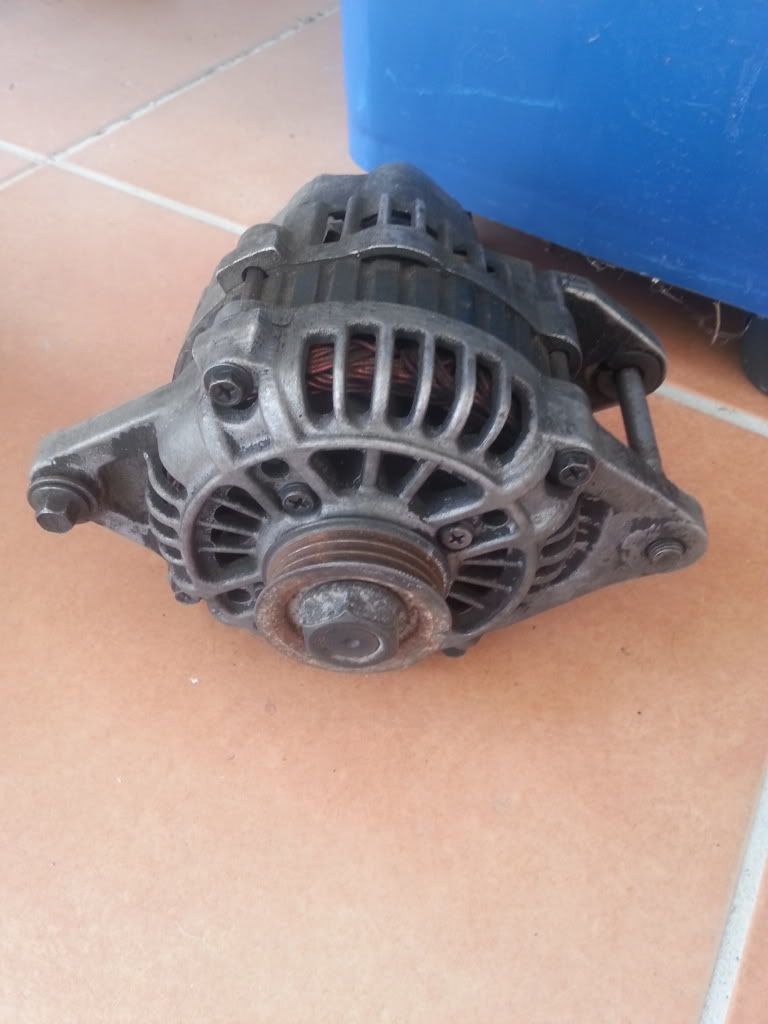 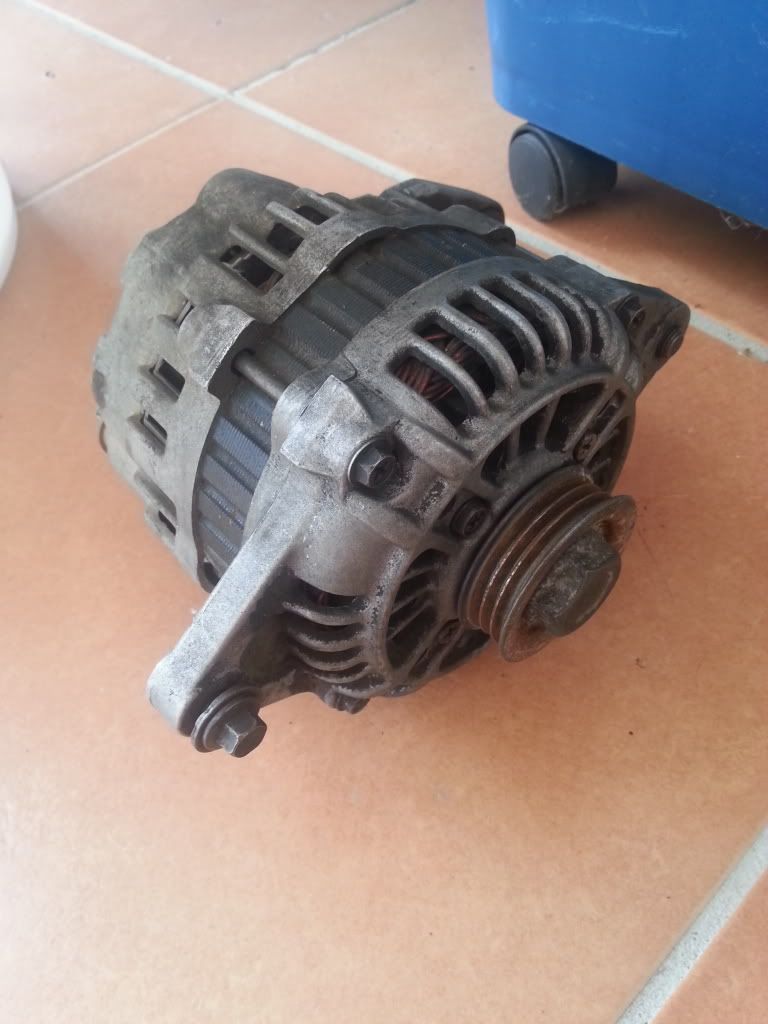
|
|
|
|
|
Jazzor
az supporter
Joined: Sat Jul 24, 2010 4:42 pm Posts: 502 Location: Kingston, Tas
Vehicle: 85 Suzuki Sierra
|
Posted: Tue Mar 26, 2013 12:12 am |
|
It looks very very very similar to the one that fitted to my non-vvt engine . _________________ Orange LWB Sierra
|
|
|
|
|
Blakey
Joined: Sun Mar 04, 2012 6:11 pm Posts: 464 Location: Brisbane, Petire
Vehicle: Jimny 3"lift Flares 31's
|
Posted: Tue Mar 26, 2013 6:25 am |
|
Scales wrote: Well I got a hold of this little beasty from my mates old falcon. dunno what year/model. think its an EA/EB? I dunno these things at all... you blokes rekon it will fit the Jimny? Its a non-vvt m13a.
Blakey, any reason you say ONLY 2005+ VVT etc? you imply to know why it wont fit a non-vvt....
I mainly have said that because these instructions would be different for a non-VVT as the mount and fuse box is different, and i haven't put one in a non-VVT to get pictures and know how to put one in it, the general way of how to do it would be the same tho. with using spacers and washers and drilling out the mount. I believe Jazzor has put one in a Non-VVT, If you want to do it and give me the pictures and a write up on it for a non-VVT i can add it to this Thread so it for all the Jimny's
|
|
|
|
|
Scales
az supporter
Joined: Mon May 30, 2011 9:28 am Posts: 2233 Location: Townsville
Vehicle: 03 Jim M13A no-vvt, Vinyl Spec
|
Posted: Tue Mar 26, 2013 3:48 pm |
|
Blakey wrote: i can add it to this Thread so it for all the Jimny's I have the power to post too ya know? lol  Very glad its the same as you blokes, the price was right (freeeeee) and my mate said he replaced it just before the car shat itself too. so thats a bonus! Thanks for the heads up. Jazzor do you have any pics of your upgrade? any advice? EDIT: just re-read the thread and saw your pic of the bottom mount, oops.  I just saw that you guys have a 6pk pulley... mine seems to be only 3 though. Also blakey, you ID' the pins on the little plug in your post, as left and right, but they are top and bottom in the pic. Can you edit the pic in paint or something to ID them a bit better? considering old mate who cooked his electrics, this would be a shame to not to ID thoroughly
|
|
|
|
|
Jazzor
az supporter
Joined: Sat Jul 24, 2010 4:42 pm Posts: 502 Location: Kingston, Tas
Vehicle: 85 Suzuki Sierra
|
Posted: Tue Mar 26, 2013 9:21 pm |
|
There is a few more pics in this post of mine: http://www.auszookers.com/forum/viewtop ... 5&start=98Yea looking at my pic it runs on the furthest 3 out, so you will probably have an issue there. And advice?, its only 2 wires, I didn't upgrade anything except the main engine fuse to 120 and nothings melted the few 4wding trips I've done . Cheers. _________________ Orange LWB Sierra
|
|
|
|
|
Blakey
Joined: Sun Mar 04, 2012 6:11 pm Posts: 464 Location: Brisbane, Petire
Vehicle: Jimny 3"lift Flares 31's
|
Posted: Tue Mar 26, 2013 9:29 pm |
|
Scales wrote: Blakey wrote: i can add it to this Thread so it for all the Jimny's I have the power to post too ya know? lol Very glad its the same as you blokes, the price was right (freeeeee) and my mate said he replaced it just before the car shat itself too. so thats a bonus! Thanks for the heads up. Jazzor do you have any pics of your upgrade? any advice? EDIT: just re-read the thread and saw your pic of the bottom mount, oops. I just saw that you guys have a 6pk pulley... mine seems to be only 3 though. Also blakey, you ID' the pins on the little plug in your post, as left and right, but they are top and bottom in the pic. Can you edit the pic in paint or something to ID them a bit better? considering old mate who cooked his electrics, this would be a shame to not to ID thoroughly you know what i meant to the initial post of mine unless you can edit that yourself haha i did say with the charging post upwards but i will rotate the pic so its easier to understand
|
|
|
|
|
Scales
az supporter
Joined: Mon May 30, 2011 9:28 am Posts: 2233 Location: Townsville
Vehicle: 03 Jim M13A no-vvt, Vinyl Spec
|
Posted: Mon Apr 01, 2013 6:52 pm |
|
Blakey wrote: i did say with the charging post upwards Missed that bit...;. cheers bloke
|
|
|
|
|
Midnight ute
newbie
Joined: Sun Dec 02, 2018 5:17 pm Posts: 3
Vehicle: Suzuki Jimny Ute
|
Posted: Sun Dec 02, 2018 5:51 pm |
|
|
Hello, new member here.
I have done the El alternator upgrade however it's over charging. 15.2 volts can't get it below 14.7volts running accessories.
I have checked the ig fuse but still solid and getting the same 15.2 volts through it. I am unsure how I can reduce the field in the alternator.
I am currently on the road which makes some things difficult but have all tools I should need. Thinking I may have cooked a coil pack because of it.
Any advise to add/ remove bits to make it operate properly would be awesome. Really don't want to cook anything major.
Thanks for the help.
|
|
|
|
|
Blakey
Joined: Sun Mar 04, 2012 6:11 pm Posts: 464 Location: Brisbane, Petire
Vehicle: Jimny 3"lift Flares 31's
|
Posted: Mon Dec 03, 2018 7:45 am |
|
|
id say the issue is your sense wire. if that has a higher resistance then the regulator will get a lower voltage back in turn raising the voltage of the output on the alternator (as it thinks it's actually something lower so it adjusts to compensate).
a simple fix would be run a new sense wire from battery to sense input. if that is the actual problem. other issues could be the regulator playing up.
(make sure you check this will actually work i'm just going off my knowledge of how an alternator works. i'm not actually sure how a jimny gives the sense input to the alternator and you don't want to accidentally bypass something that jimny might do to that sense wire)
i wouldnt think you will be able to easily kill a coil with that. i can't say for sure tho. i would of thought at most your battery would overcharge.
|
|
|
|
|
Midnight ute
newbie
Joined: Sun Dec 02, 2018 5:17 pm Posts: 3
Vehicle: Suzuki Jimny Ute
|
Posted: Fri Dec 07, 2018 8:39 am |
|
|
Thank you Blakey,
Took it to a shop and the auto electrician found the wires where the wrong way round, charging up the alternator to max, however when they where the correct orientation the battery light was on, which is why I had put the wires in the way I had.
Alternator is changing perfectly like that (14.2v) but the battery light remains on. In the wrong orientation the battery light was off. Do you know if the battery wire requires feed from the alternator to go up to the light or power goes through the light into the alternator? Trying to work out if its a faulty alternator or if I need to adjust the wiring in a way that stops flow in one direction.
Coil pack was definitely cactus, has only done around 40000km, had a spare which is working a treat now.
|
|
|
|
|
|


