| auszookers.com https://www.auszookers.com/forum/ |
|
| Bogfrogs WT Diff to NT Step by Step https://www.auszookers.com/forum/viewtopic.php?f=14&t=5293 |
Page 1 of 1 |
| Author: | bogfrog [ Sun Jun 21, 2009 1:12 pm ] |
| Post subject: | Bogfrogs WT Diff to NT Step by Step |
Fitted My WT Diffs, thought I'd make a bit of a step by step may help others with their mods? Front Diff 
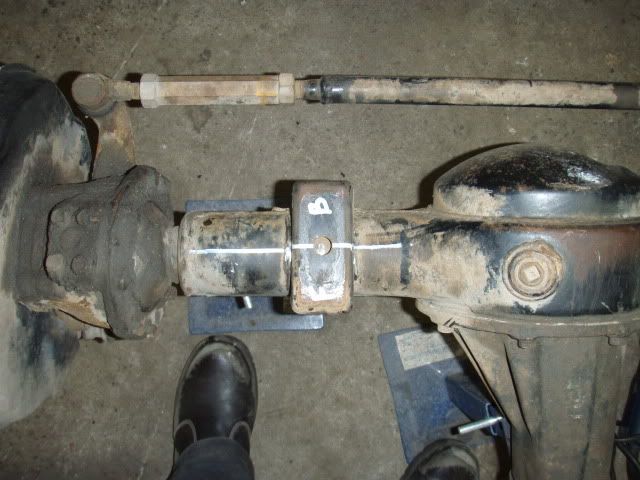
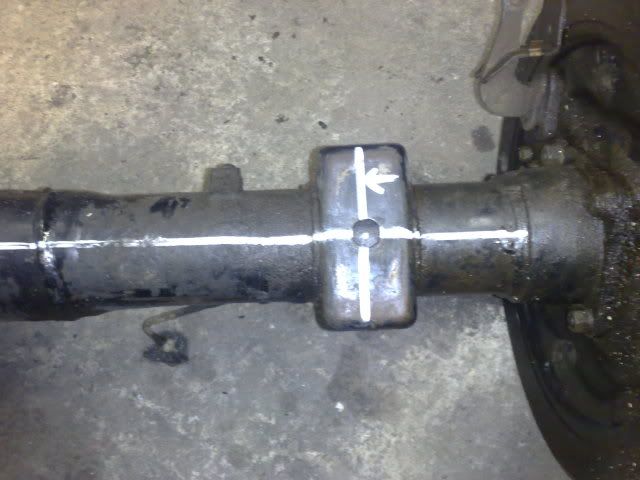
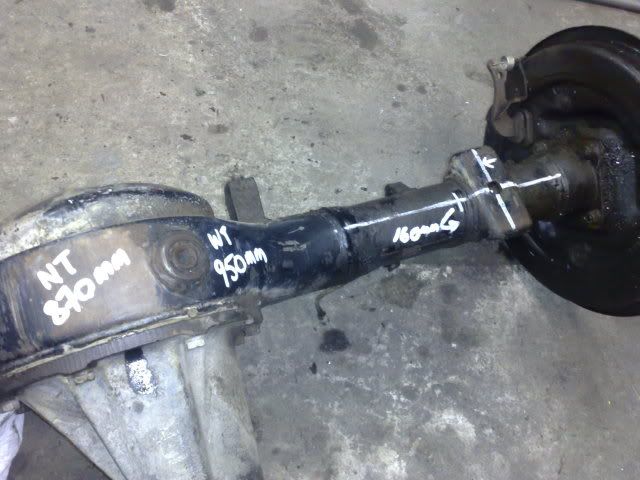
First we marked a line straight thru the locating holes on the perches and along the diff tubes this line is what will help keep the angles all correct, also centre punched the tubes where the locating hole was as a reference point to work off, we marked front and back of perch in case it fell off while checking measurments etc..
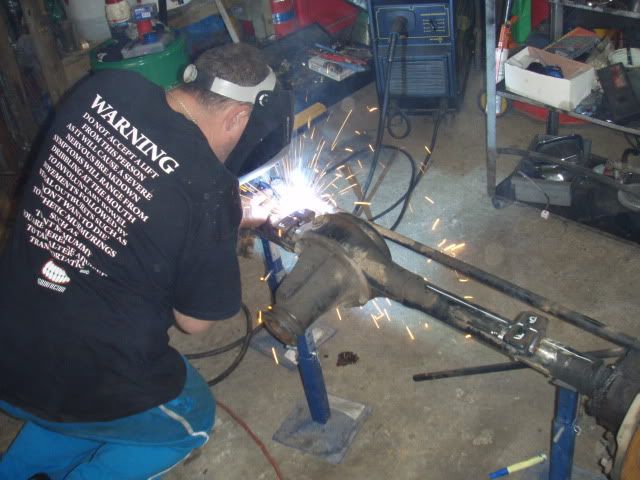
Then we proceeded to cut mounts off with an angle grinder trying not to cut into the tubes.
Cleaned up the the old welds with a grinding disc making sure to re-mark our lines if we removed any at any time.
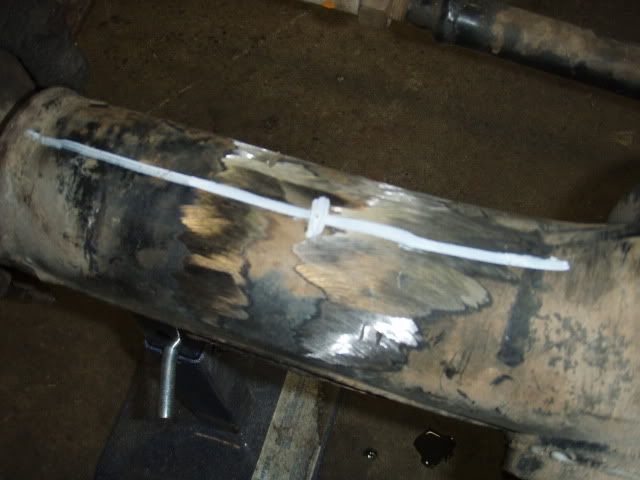
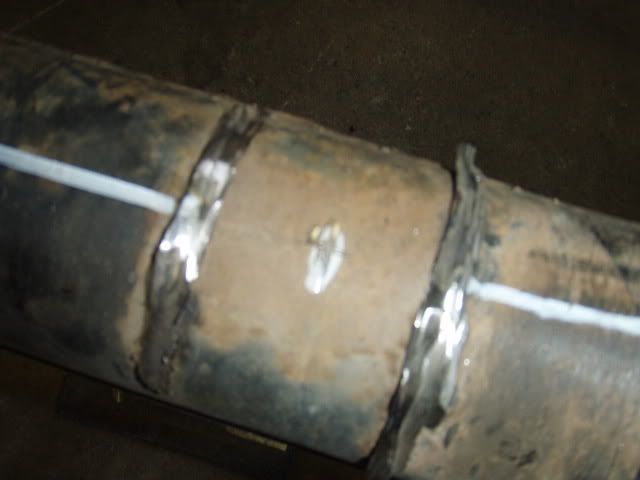
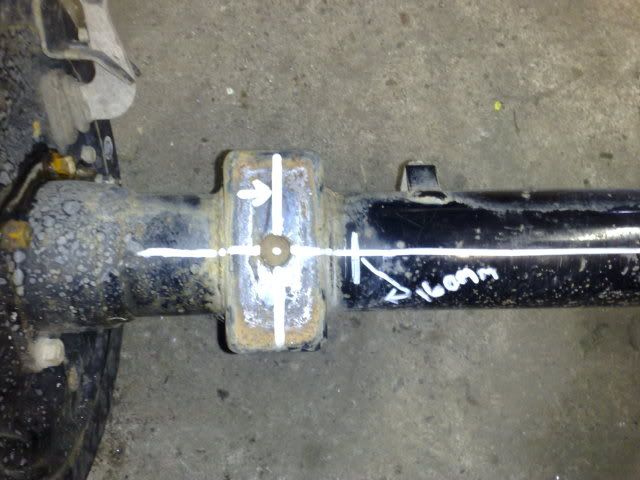
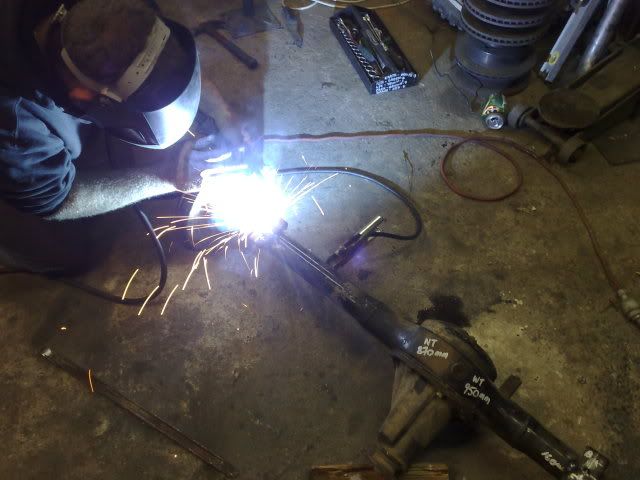
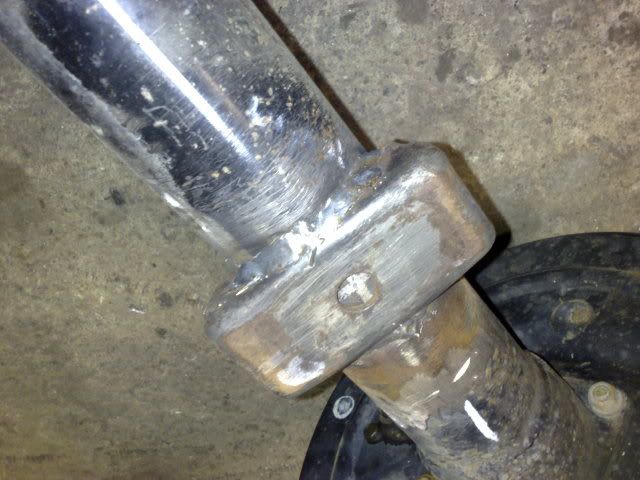
Then measured NT Diff perches locating holes (centre to centre) then measured the WT ones & devided the difference by 2 and remounted the perches to line up centre of this mark, We checked both measurements from the end of the tubes to be sure (it's roughly 150mm from inside edge of small lip on end of diff tubes.) then we tacked one on at a time and lay a straight edge on each one and eyed them up level but kept the main mark on tubes lined up! when happy we welded em up a little at a time so as not to put too much heat into one area! didn't want to warp to tubes in any way. I have also removed and refitted the U-bolt locators as well, the one on the short side we had to cut in half because it rode up on an angle and would not sit properly. Then we rewelded the hump half of it to the pumpkin and made sure that the U-bolts sat straight before tacking or welding in place.
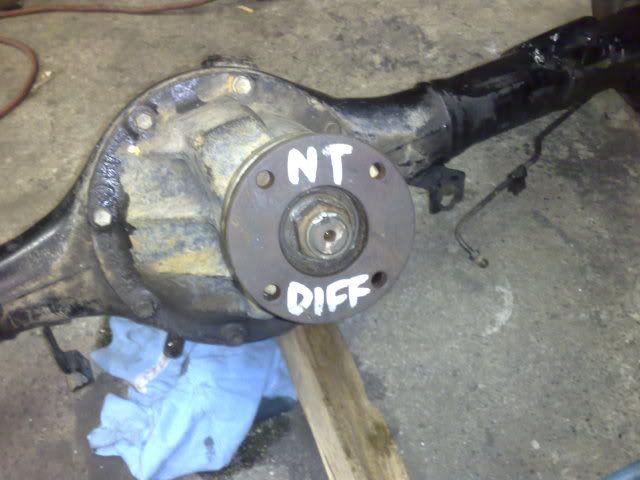
Once all welded and painted we fitted it all up using a WT Drag link and swapped the flanges on the diff and my 1ltr transfer case to NT ones or you could always redrill the WT to NT spacing at the diff if you wanted to? Now the standard 1.3 drive shaft will just bolt straight in. Fit up extended brakelines and bleed brakes, fill diff and transfer and we're all done. Now moving on to the rear.
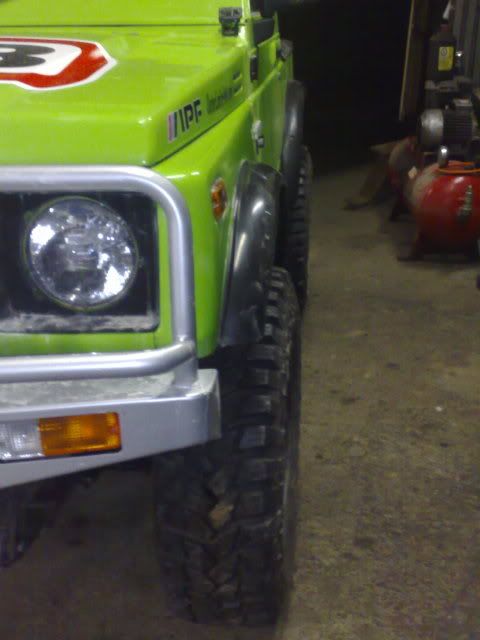
She's a good 50mm wider each side now as you can see compared to the rear!
Rear Diff Ok remove rear diff, drive shaft, brakelines as before.
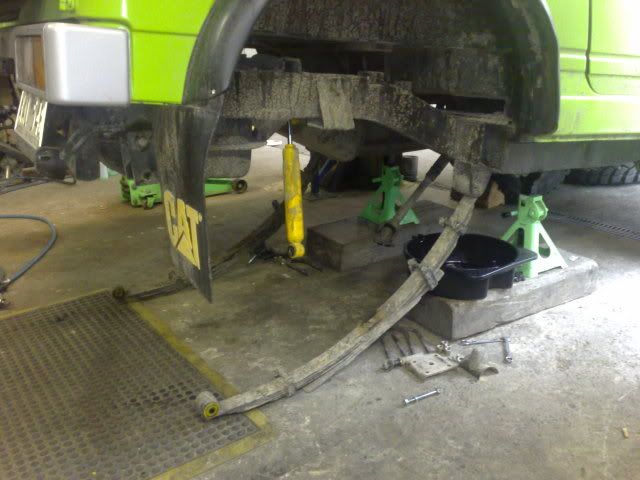
Remove all brake lines from new diff so as not to cut thru when grinding, I removed the hand brake cable set up as mine has a transfer hand brake set up now. Next mark lines on tubes thru centre of perch locator holes and then along perch as well also mark centre of locator same as before.
Then work out new mounting position as with front diff previously and mark and centre punch so as not to lose mark while grinding.
It works out to around 160mm from back of plate on the end of tube.
Cut mounts off again trying not to cut into tubes and move to new location, tack one in place then lay a straight edge on each as done before and eye the two up together.
Then when happy weld in place as before.
Clean up welds with a wire brush and paint.
Then change diff flange to NT one.
I had to change the transfer brake drum to NT 1.3 because mine has a 1ltr transfer but same as removing a flange basically, just unbolt and release hand brake and remove drum. Ok now you can fit rear diff back into car just re-use all previous conponents from before. Once all back in refit WT brake lines a little bending is needed in order to refit and if it's a 1ltr model you'll need to drill out brake line mounts on chassis to around 18mm dia to fit, then bleed, fill etc etc..
refit wheels all done!
Hope this helps a few out with their conversion? Cheers Robb. |
|
| Author: | 11_evl [ Sun Jun 21, 2009 3:31 pm ] |
| Post subject: | Re: Bogfrogs WT Diff to NT Step by Step |
great write up instead of swapping diff flanges, you should of swapped the whole centre as the NT ones are 3.9 just a thought |
|
| Author: | bogfrog [ Sun Jun 21, 2009 3:45 pm ] |
| Post subject: | Re: Bogfrogs WT Diff to NT Step by Step |
Nah the diffs under her before were 1ltr ones I have front and rear welded 1.3 ones at home but not gonna use em as I want ARB air Lockers so I just stole the flanges off them. I'm keeping my eyes out for open NT 1.3 ones anyway. |
|
| Author: | steve [ Sun Jun 21, 2009 4:25 pm ] |
| Post subject: | Re: Bogfrogs WT Diff to NT Step by Step |
Nice work bogfrog
you even have a green trollyjack and stands |
|
| Author: | bogfrog [ Sun Jun 21, 2009 5:04 pm ] |
| Post subject: | Re: Bogfrogs WT Diff to NT Step by Step |
Accessorise, accessorise, accessorise Thanks Steve was a rather easy conversion with a little research before-hand ( Always pays to Research ). cheers Robb.
|
|
| Author: | Pubic [ Sun Jun 21, 2009 5:39 pm ] |
| Post subject: | Re: Bogfrogs WT Diff to NT Step by Step |
diffs look somewhat familiar.... good to see all went well. very good of you to do the write up. im sure many people will appreciate it! |
|
| Author: | Built4thrashing [ Mon Jun 22, 2009 1:22 am ] |
| Post subject: | Re: Bogfrogs WT Diff to NT Step by Step |
I can help you out with the open Nt front ctr as i have 2 NT front diffs sitting in my shed. Shoot me a PM is ya interested. Im in dandenong. B4T |
|
| Author: | bogfrog [ Tue Jun 23, 2009 10:43 pm ] |
| Post subject: | Re: Bogfrogs WT Diff to NT Step by Step |
Built4thrashing wrote: I can help you out with the open Nt front ctr as i have 2 NT front diffs sitting in my shed. Shoot me a PM is ya interested. Im in dandenong.
B4T PM Sent |
|
| Author: | jonno_racing [ Thu Aug 16, 2012 3:35 pm ] |
| Post subject: | Re: Bogfrogs WT Diff to NT Step by Step |
thanks for the how to rob |
|
| Author: | bohuler [ Fri Aug 17, 2012 8:16 am ] |
| Post subject: | Re: Bogfrogs WT Diff to NT Step by Step |
Hey I recognise that Zook, i bought the green n/t flares off ya a few years ago rob |
|
| Author: | mazdaspater [ Sun Sep 02, 2012 9:10 pm ] |
| Post subject: | Re: Bogfrogs WT Diff to NT Step by Step |
Sorry to bring this to your attention, but you did something badly wrong. You welded the saddles back on the bottom of the diff housing, not on the top where they are supposed to go. SPOA is The GOA |
|
| Author: | bogfrog [ Sun Sep 02, 2012 9:49 pm ] |
| Post subject: | Re: Bogfrogs WT Diff to NT Step by Step |
mazdaspater wrote: Sorry to bring this to your attention, but you did something badly wrong. You welded the saddles back on the bottom of the diff housing, not on the top where they are supposed to go. SPOA is The GOA Not if you wanna keep it low This is just a guide to fit WT diffs, SPOA is a completely different topic |
|
| Author: | foolsp33d [ Mon Sep 03, 2012 1:08 am ] |
| Post subject: | Re: Bogfrogs WT Diff to NT Step by Step |
mazdaspater wrote: Sorry to bring this to your attention, but you did something badly wrong. (why are you sorry for bringing it to his attention and define 'badly')
You welded the saddles back on the bottom of the diff housing, not on the top where they are supposed to go.(If they were 'supposed' to go on the top.. why are they not from factory?) SPOA is the GOA (What happened here?? Where you trying to say SPOA is for GOATS..?) |
|
| Author: | Joshyboy26 [ Mon Jan 12, 2015 5:14 am ] |
| Post subject: | Re: Bogfrogs WT Diff to NT Step by Step |
Grave dig! On the front do you have to move the shock mounts at all? will the shocks still clear the chassis or are they on a wierd angle? |
|
| Author: | Blkfxx [ Mon Jan 12, 2015 7:45 am ] |
| Post subject: | Re: Bogfrogs WT Diff to NT Step by Step |
Same clearance as a stock NT as the mounts move back to NT spacing. |
|
| Author: | Gwagensteve [ Mon Jan 12, 2015 12:40 pm ] |
| Post subject: | Re: Bogfrogs WT Diff to NT Step by Step |
Oops just typed something that made no sense. |
|
| Page 1 of 1 | All times are UTC + 9:30 hours |
| Powered by phpBB® Forum Software © phpBB Group https://www.phpbb.com/ |
|