auszookers.com
https://www.auszookers.com/forum/

ORA jimny conversion install!
https://www.auszookers.com/forum/viewtopic.php?f=17&t=30820
Page 1 of 4

Author:  monley [ Tue Feb 28, 2012 11:30 pm ]
Post subject:  ORA jimny conversion install!

Hi guys,

As some of you jimny owner's know, Off Road Armoury have released a new transfer case conversion kit. As this kit was only released last week, there is no information on how to install the kit. Here is the write for the install for the 1st version of the ORA conversion kit http://www.bigjimny.com/images/document ... mounts.pdf This is the most detailed write up i have for the 1st version of the kit, most of which still apply's to the new kit.

Any way, here is my write up on how to install the new kit.

Parts required:
x1 SJ wide track transfer case
x1 Front wide track drive shaft
x1 wide track jack shaft (gear box to transfer case)
x1 ORA conversion
x1 Set of SJ free wheeling hubs with adapter rings

Tools required:
-12, 14, 17 and 27mm sockets
-10, 12, 14 and 17mm open end spanner's
-Long nose pliers (for undoing electrical clips :wink: )

Misc.
-oil ( I used VMX 80w-90)
x12 drive shaft bolt's and nut's ( i used all the original sierra drive shaft bolts)
- Press ( or oven and freezer)
- Oxy ( or big hammer)

Step 1: Remove the out put flange on the back of the sierra transfer case. Best way to get this off, is with a heavy duty rattle gun. If you don't have access to a rattle gun, get a peace of flat bar 1000mm+, drill 2 hole's into the flat bar the same distance apart as what they are on the flange. From memory that is 60mm and the hole size 12mm, then bolt the flat bar into the flange. Then get a 27mm socket with a break bar, and then crack the nut. If you are finding it very hard to crack, get a peace of pipe and slip of the breaker bar to add more leverage making it easier to crack the nut.


Step 2: Once the flange has been removed, you need to knock the backing cup off.
Image

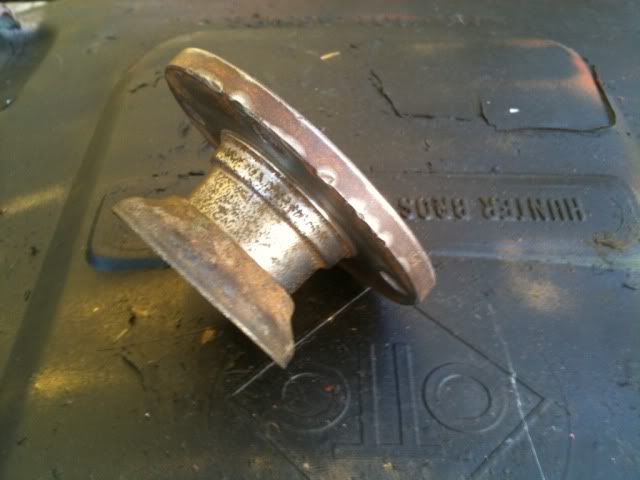
This can be done with a hammer or it can be cut off. The flange should then look like this.

Image

Clean the flange up with a wire wheel removing any surface rust then paint to your colour of choice.

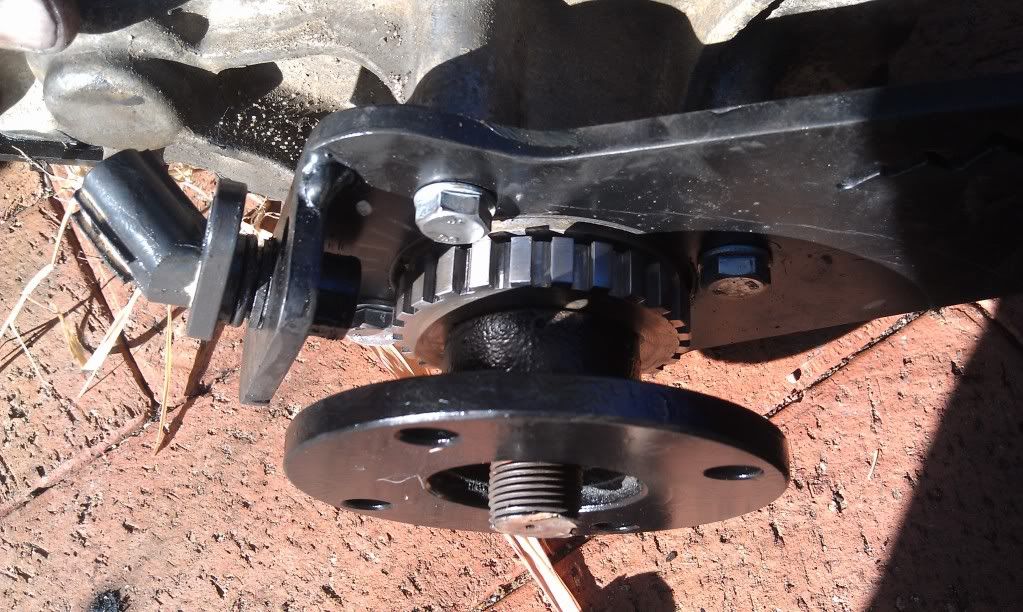
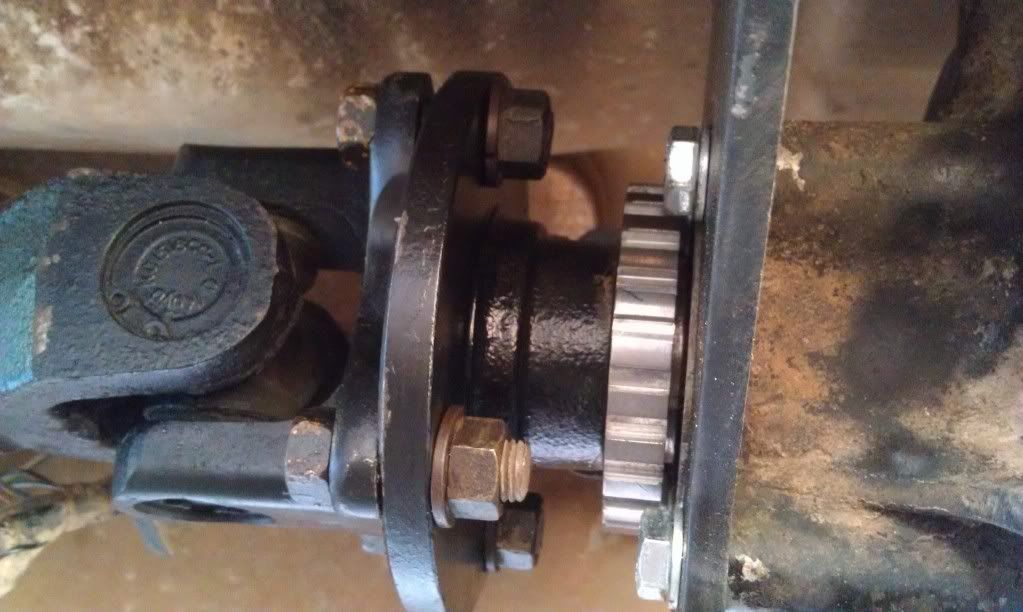
Step 3: Now the speedo wheel needs to be put on the flange.

Image

Image

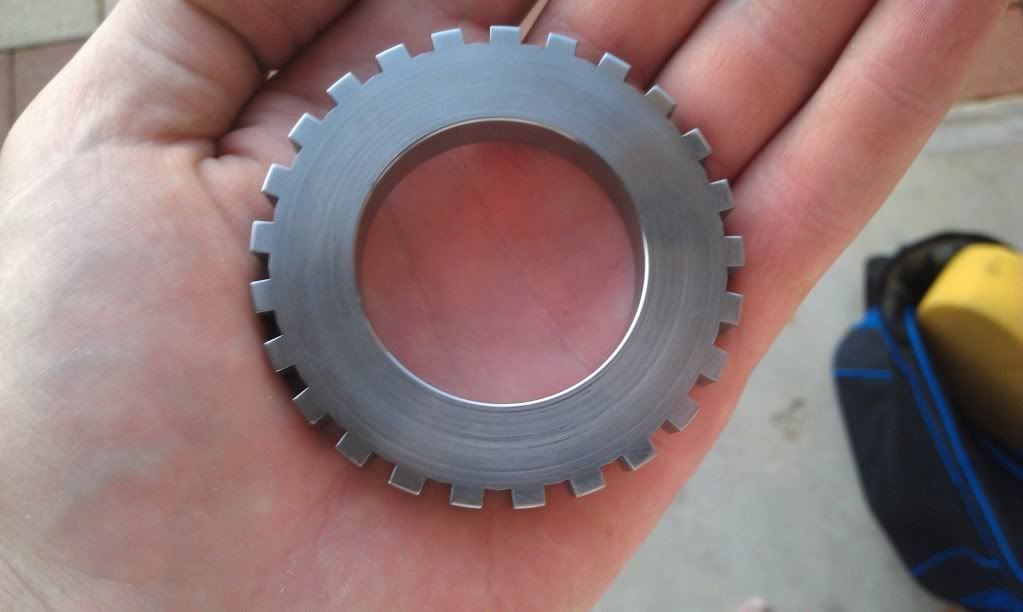
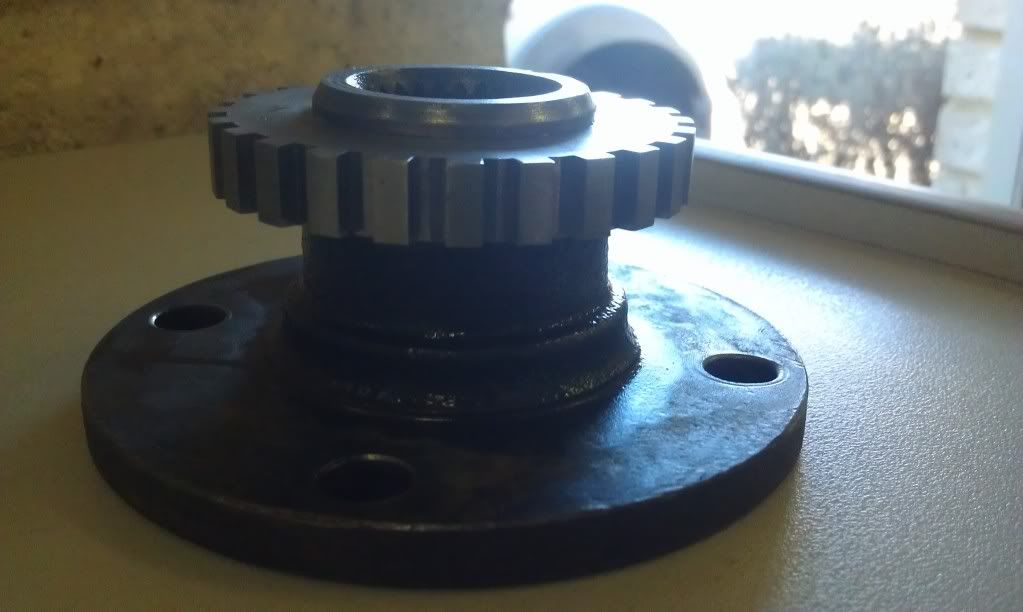
There are several ways of putting the wheel on. The best optoin is to get it pressed on. If you don't have access to a press, another optoin is to put the flange in the freezer for a few hours to contract the size of the flange. While the flange is freezing, the ring gear needs to be put into the oven to expand it. Once the flange has contracted and the ring has expanded, slip the ring gear over the back of the flange. Work fast though, you don't want either item going back to it's original size while the ring is half way on!!!

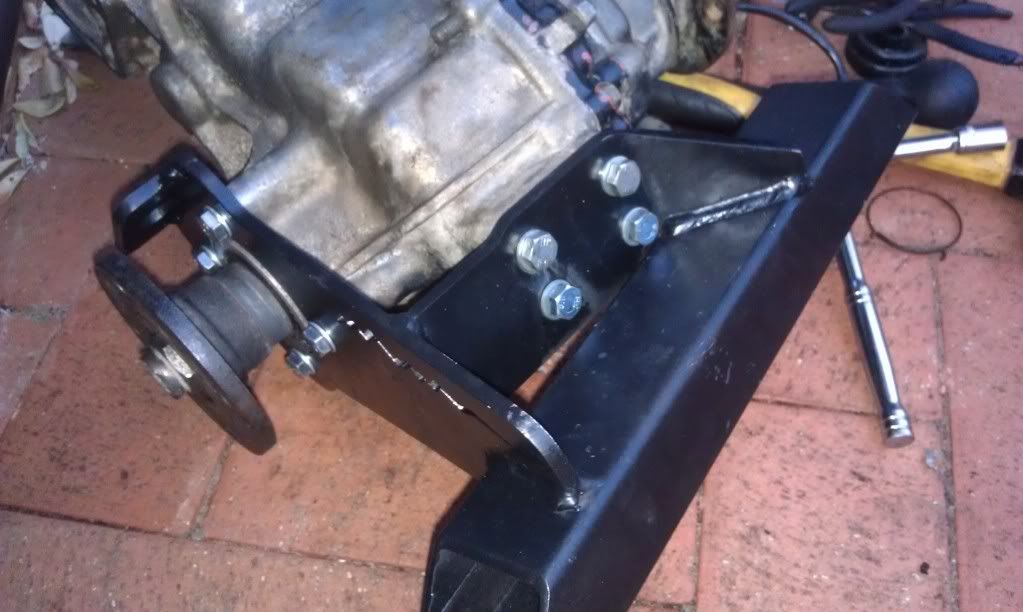
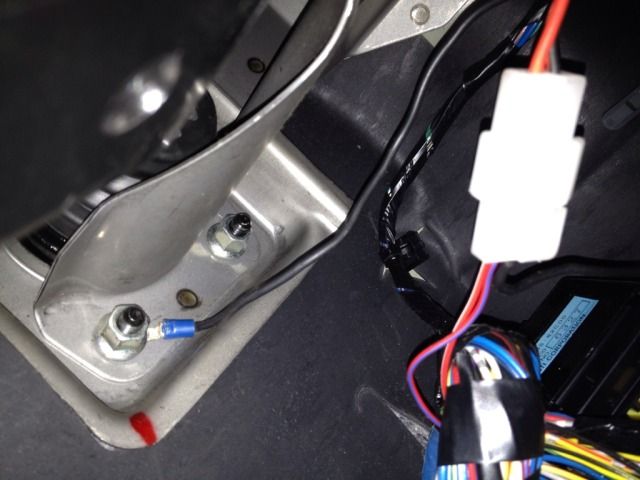
Step 4: Next the transfer case mount needs to be bolted on while the flange is off, like so:

Image

Step 5: Now the rear out put flange can be put back. Make sure the bolt is tight to!!!

Image

Step 6: Now the speed sensor can be put on. This part with will need to be removed from the jimny t-case as seen here:

Image

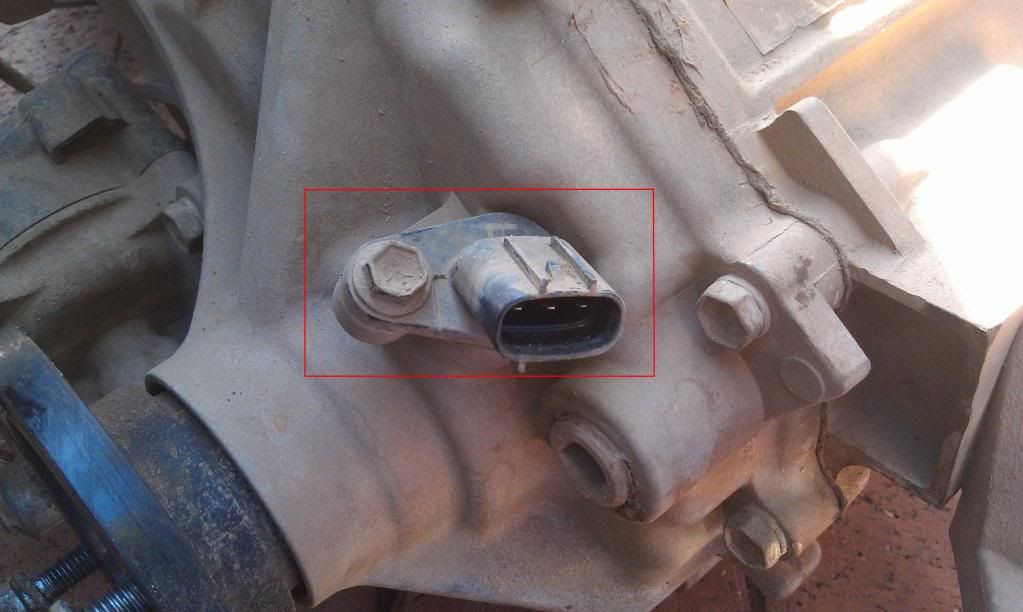
Once removed you will need to find a nut & bolt to suit the hole size. There is also a rubber o-ring that needs to be removed. Once that is done is can be put onto the t-case mount.

Image

It needs to be tapped down lightly with a hammer unti it's hard up on the mounting face, as it's a very "Snug" fit. :wink:

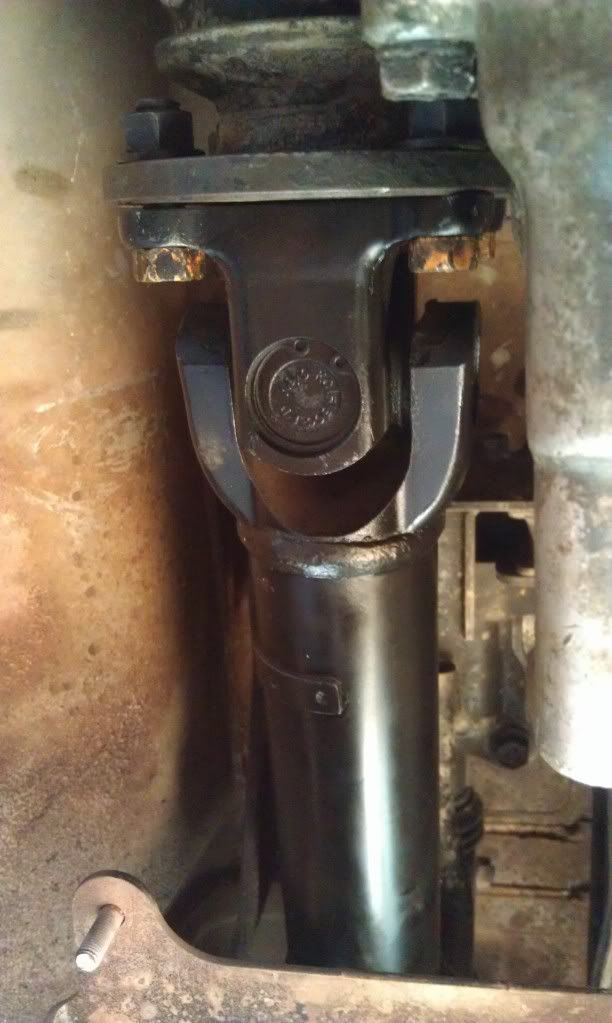
Step 7: Once the jimny transfer, jack shaft and rear shaft have been removed, you can then put the WT jack shaft into the gear box and bolt the rear tail shaft to the rear diff ( Hint: Park the car with the back end higher than the front to stop oil coming out of the back of the gear box :wink: )

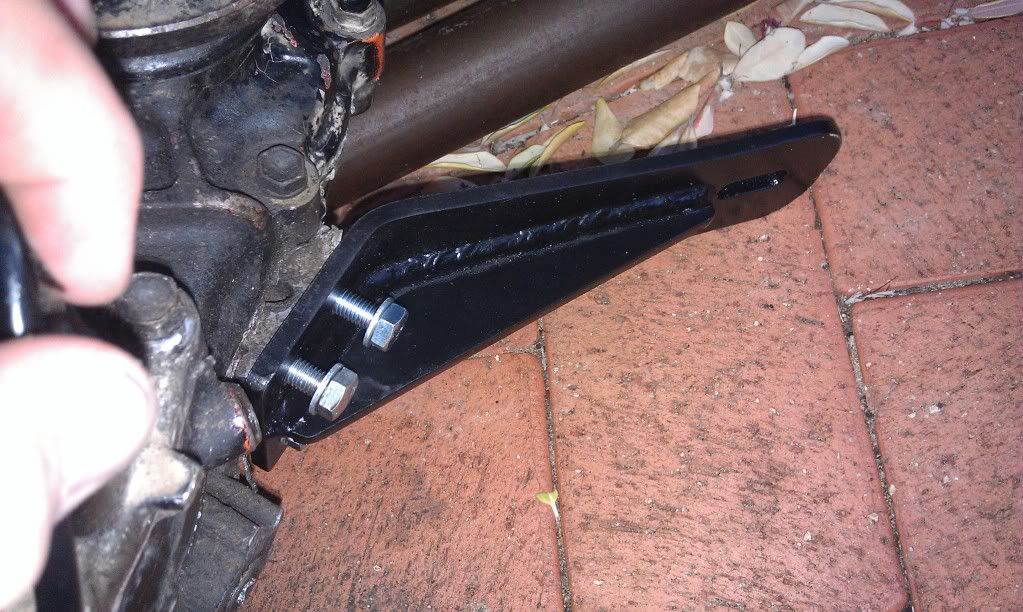
Step 8: The transfer can now be put into the car. Rest the 2 mount's on the chassis and the other side on the exhaust. The small bush goes on top of the mount with a washer, the larger one in the middle then the bolt from the bottom up. Like so:

Image

Don't do these bolt's up yet.

Step 9: Now the other side mount can be put on. The poly mount's go on in the same order as the other side does. The mount can also be bolt onto the t-case now.

Image

Step 10: Now all the drive shaft's can be bolted back onto the transfer case. Best not to do the mount's up yet as the rear tail shaft was a tight fit. Once all the drive shaft bolt's are tight the mount's can be do up at the same time.
ImageImage

Step 11: The transfer case can now be filled it oil and the speedo sensor cable can be connected back up at the same time.

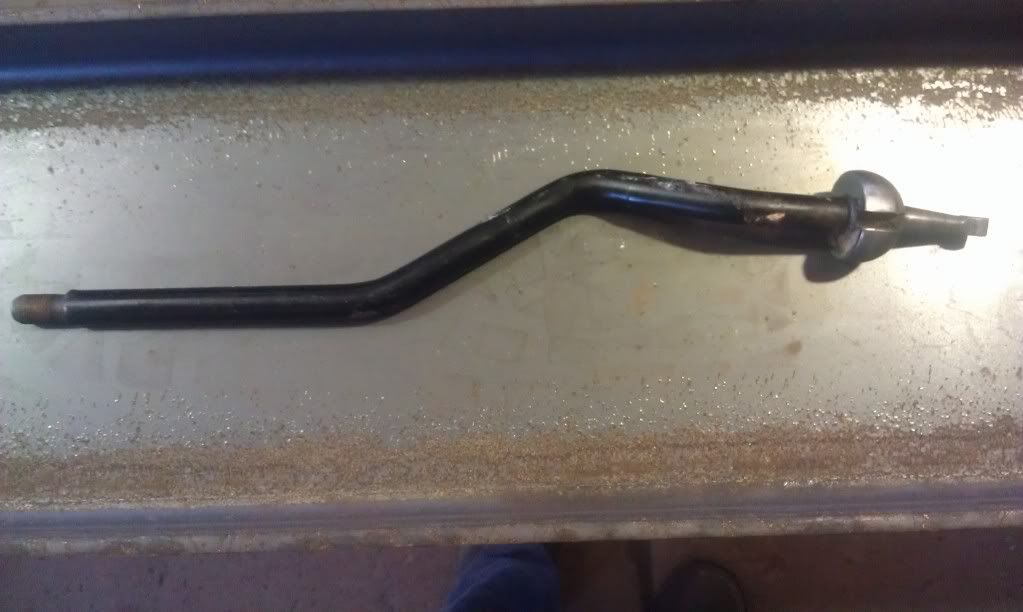
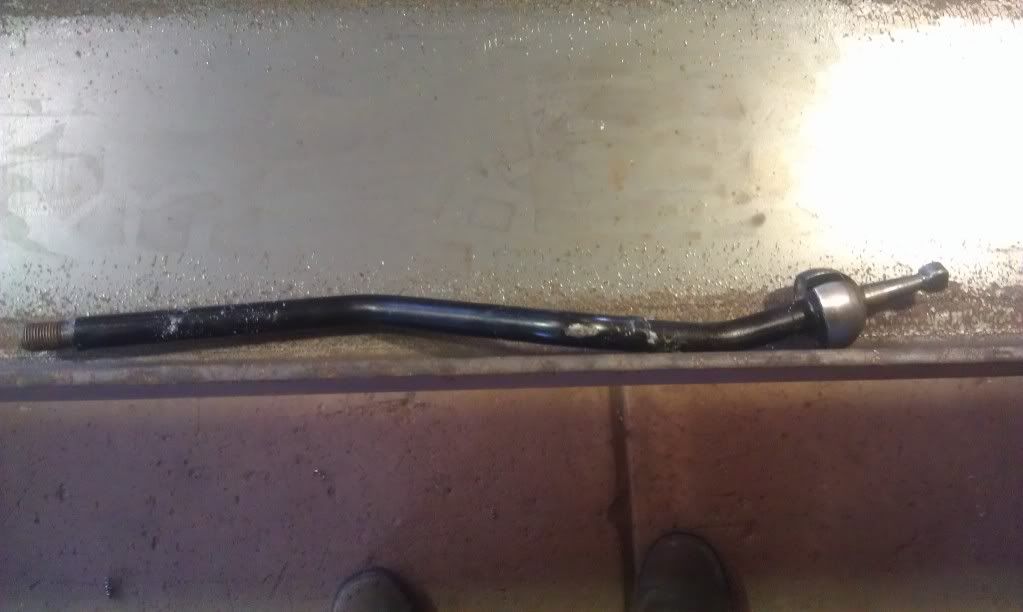
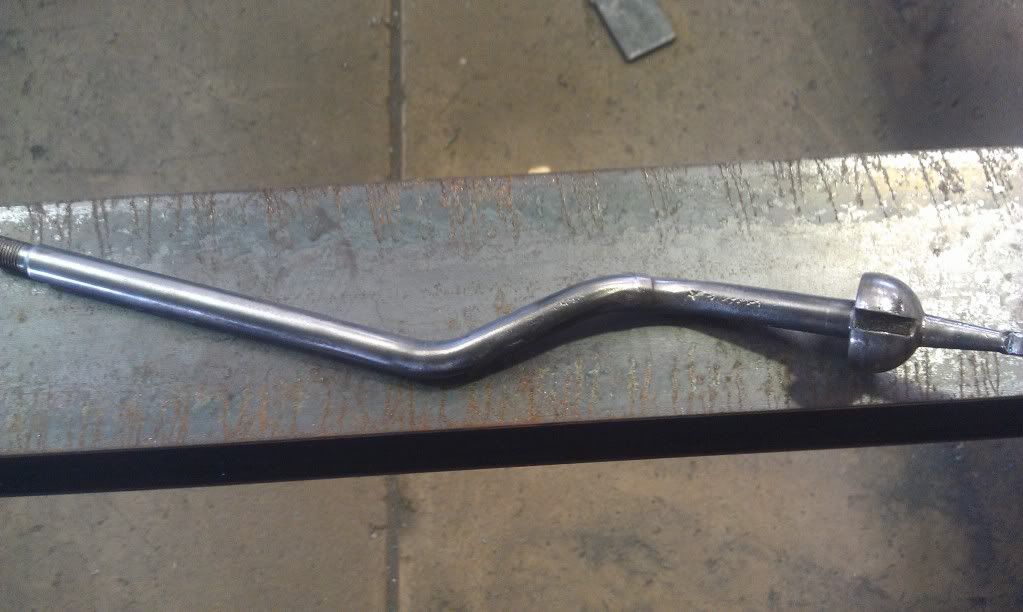
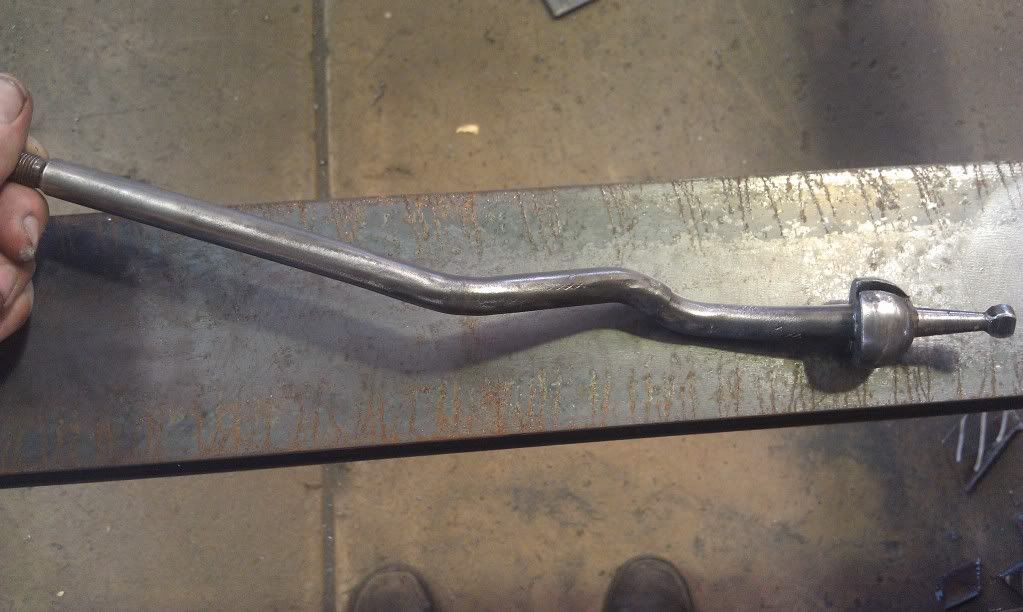
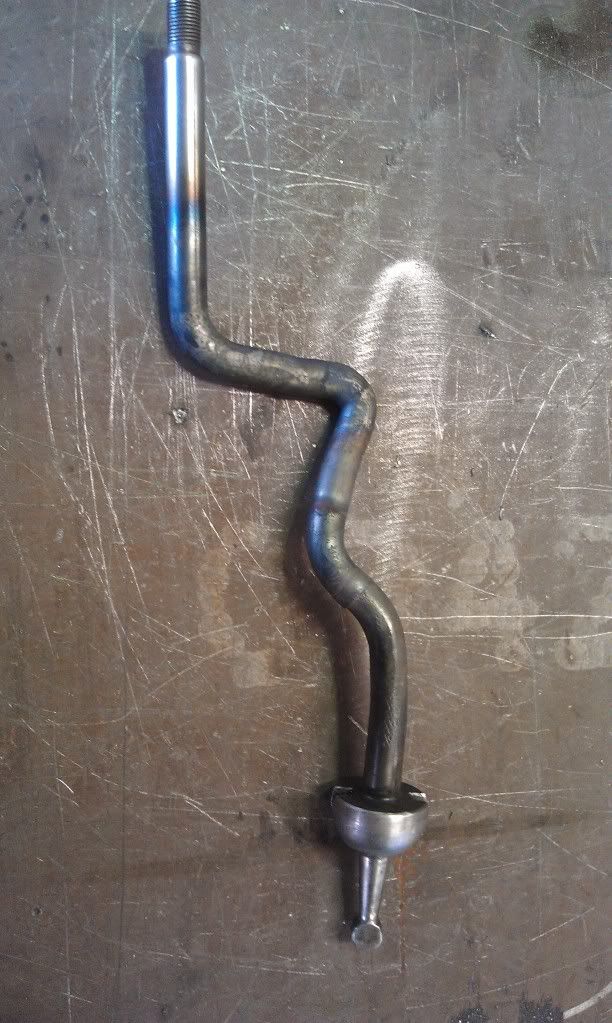
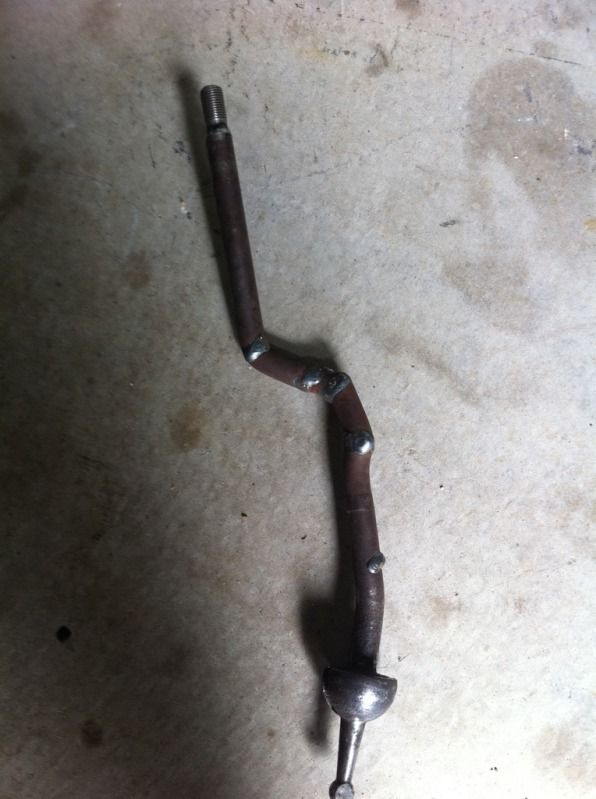
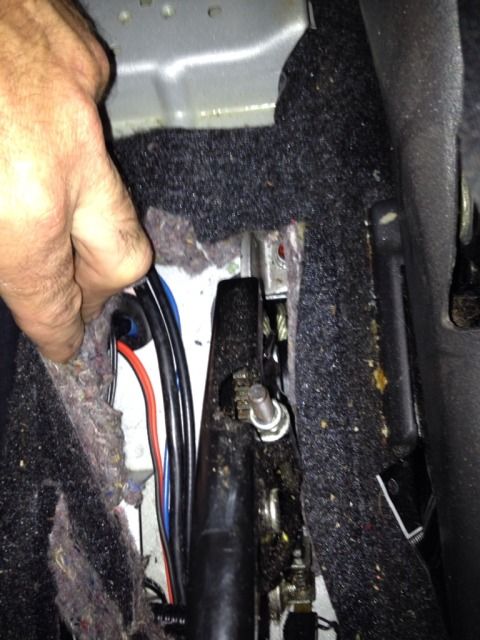
Step 12: The transfer case stick now needs to be bent to clear the hole in the floor. As you can see there is not a lot of room in there.

Image

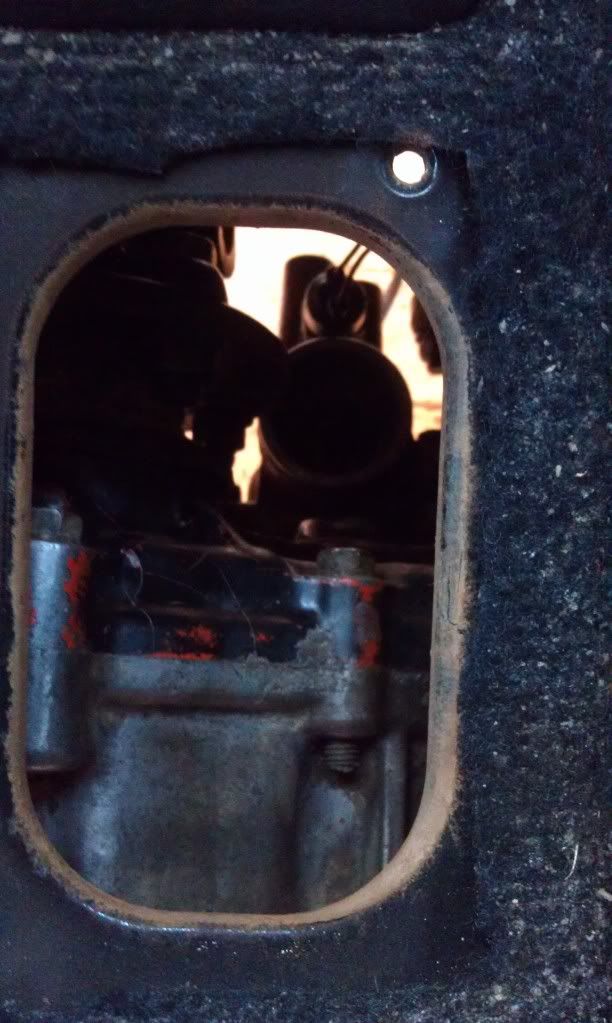
IMO the best way to get the best position for the stick, is to heat it with a oxy, make it straight & start from scratch then bend to suit. I have not done this part yet, but once i have done it tomorrow i will upload a picture.

Other notes:
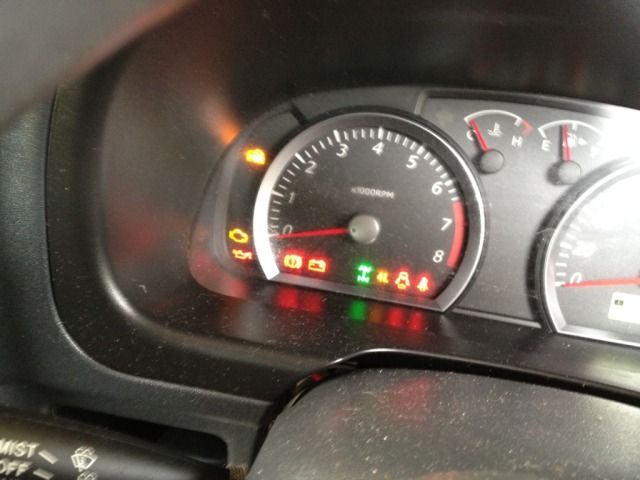
- 4wd light flashes. I beleave the fix is just to join a few wires together. Once i have figured out which one's i will share my finding's
- The vacuum's hubs can be rigged up to work with the SJ case. All that is needs to be done make this work is a switch at one of electrical joiner's. I did have it working, but didn't rig up a switch because i ran out of day light. This will allow you have have 2wd low range with out getting out of your car :)

If i have missed any thing or you need any more info, please ask and i will help where i can.

Hope this helps someone!

Cheers,

Monley

Author:  atari4x4 [ Tue Feb 28, 2012 11:54 pm ]
Post subject:  Re: ORA jimny conversion install!

nice write up Image

we need a goodtech smiley

Author:  christover1 [ Wed Feb 29, 2012 7:48 am ]
Post subject:  Re: ORA jimny conversion install!

Excellent, makes me want to get a Jimmy.
Good write up, good tech

Author:  zooky08 [ Wed Feb 29, 2012 7:52 am ]
Post subject:  Re: ORA jimny conversion install!

I have everything accept the kit :D

Author:  31zook [ Wed Feb 29, 2012 12:52 pm ]
Post subject:  Re: ORA jimny conversion install!

Nice monley, very detailed.

Hoping mine show up today, so I can fit em tomorrow :-)

Author:  Teracis [ Wed Feb 29, 2012 4:16 pm ]
Post subject:  Re: ORA jimny conversion install!

Do we know what kind of output that jimny speedo sensor sends?

I'm just thinking it might be a viable replacement which would allow me to use the Baleno speedo cluster (electronic) in my sierra and not have to rig up something to use the baleno speed sensor somehow.

Any ideas?

Author:  monley [ Thu Mar 01, 2012 8:46 pm ]
Post subject:  Re: ORA jimny conversion install!

Bending the transfer case stick:

Ok, so i have spent a good 2 hour's bending the transfer case stick to clear the hole in the gear box tunnel. It take's a lot of messing around to get in in a position where it's not hitting the transfer case, input flange or the hole in the floor.

This is the stock stick:

Image

Image

This was my first attempt at making the stick clear the hole:

Image

Image

This didn't work that well, it would clear 2H and 4H with out any issues, but it would hit the front of the hole in 4L. I messed about for a bit longer with the stick like this, but i deiced some crazy bends were going to be needed to make it work - result:

Image

As crazy as it looks, it works and there is plenty of room so it doesn't hit any thing.

Hope this saves some time for people in the future for when they go to do this part.

Cheers,

Monley

Author:  atari4x4 [ Thu Mar 01, 2012 8:56 pm ]
Post subject:  Re: ORA jimny conversion install!

8O nice work monkey

Author:  31zook [ Thu Mar 01, 2012 10:24 pm ]
Post subject:  Re: ORA jimny conversion install!

G13bb jimny's must be different.... Mine needs one more bend to clear the seat and we are awesome.

Image

Author:  zukenutter [ Fri Mar 02, 2012 7:05 am ]
Post subject:  Re: ORA jimny conversion install!

Nice tech Monley.

My stick looks nothing like either of those, three very different approaches with a similar outcome. I've always planned on attacking mine some more when I'm feeling really inspired.

How'd you go getting the spring retainer back in place?

Author:  monley [ Fri Mar 02, 2012 8:37 am ]
Post subject:  Re: ORA jimny conversion install!

Thanks atari :)

zukenutter wrote:
Nice tech Monley.

My stick looks nothing like either of those, three very different approaches with a similar outcome. I've always planned on attacking mine some more when I'm feeling really inspired.

How'd you go getting the spring retainer back in place?


Thanks Mr Nutter :)

Are you talking about that little sliver cup thing with the slots in it that goes around the gear stick? If so, i found it easy to put the retainer on the stick, then put it into the hole. To lock it in place i would just use a long handle, flat blade screw driver.

I

Author:  zukenutter [ Fri Mar 02, 2012 9:02 am ]
Post subject:  Re: ORA jimny conversion install!

monley wrote:
Thanks atari :)

zukenutter wrote:
Nice tech Monley.

My stick looks nothing like either of those, three very different approaches with a similar outcome. I've always planned on attacking mine some more when I'm feeling really inspired.

How'd you go getting the spring retainer back in place?


Thanks Mr Nutter :)

Are you talking about that little sliver cup thing with the slots in it that goes around the gear stick? If so, i found it easy to put the retainer on the stick, then put it into the hole. To lock it in place i would just use a long handle, flat blade screw driver.

I


I couldn't get to mine, made a "special" tool

Transfer lever tool

Author:  monley [ Sun Mar 04, 2012 2:05 pm ]
Post subject:  Re: ORA jimny conversion install!

Ok, i have wired my auto hubs into a switch on the dash. I can now turn them on and off when ever i need to. This allows for me to have 2wd low range with out getting out the car when wheeling 8)

Author:  zukenutter [ Sun Mar 04, 2012 3:32 pm ]
Post subject:  Re: ORA jimny conversion install!

monley wrote:
Ok, i have wired my auto hubs into a switch on the dash. I can now turn them on and off when ever i need to. This allows for me to have 2wd low range with out getting out the car when wheeling 8)


Good work.

Got the 4Wd light to stop flashing yet?

Author:  monley [ Sun Mar 04, 2012 3:41 pm ]
Post subject:  Re: ORA jimny conversion install!

zukenutter wrote:
monley wrote:
Ok, i have wired my auto hubs into a switch on the dash. I can now turn them on and off when ever i need to. This allows for me to have 2wd low range with out getting out the car when wheeling 8)


Good work.

Got the 4Wd light to stop flashing yet?


Thanks!

Haven't had much more of a chance to play around with the 4wd light. I broke the wire on the WT t-case senor when i was putting it back in yesterday :oops: I'm going to try the jimny sensor again later this arvo.

Author:  brindog [ Sun Mar 04, 2012 6:08 pm ]
Post subject:  Re: ORA jimny conversion install!

Thanks for the post monley.

So can you get the 4wd lights to work with the sierra transfer ?

btw those sticks look crazy !! :lol:

Author:  monley [ Sun Mar 04, 2012 7:08 pm ]
Post subject:  Re: ORA jimny conversion install!

Ok, i've sort of got the 4wd light working. The "4L" has stopped flashing with the jimny sensor in the case when ever your in 2wd, 4wd H or 4L. The green light still flashs all the time, until you engage the hubs. The light is just a solid green then, no flashing. So i'm not sure what i need to do to get the green light to stop flashing....

Author:  monley [ Sun Mar 04, 2012 9:41 pm ]
Post subject:  Re: ORA jimny conversion install!

Found the info that's needed to make it work http://www.bigjimny.com/index.php?optio ... &Itemid=75 8) I will do this tomorrow and report back.

Author:  zukenutter [ Mon Mar 05, 2012 9:14 pm ]
Post subject:  Re: ORA jimny conversion install!

monley wrote:
Found the info that's needed to make it work http://www.bigjimny.com/index.php?optio ... &Itemid=75 8) I will do this tomorrow and report back.


How'd this go?

Author:  monley [ Mon Mar 05, 2012 9:19 pm ]
Post subject:  Re: ORA jimny conversion install!

zukenutter wrote:
monley wrote:
Found the info that's needed to make it work http://www.bigjimny.com/index.php?optio ... &Itemid=75 8) I will do this tomorrow and report back.


How'd this go?


It worked yesterday, tried it today = FAIL! :x

Author:  zukenutter [ Mon Mar 05, 2012 9:44 pm ]
Post subject:  Re: ORA jimny conversion install!

That's weird. Just saw your post on Big Jimny.
I'm going to have another try tomorrow

Author:  monley [ Mon Mar 05, 2012 9:52 pm ]
Post subject:  Re: ORA jimny conversion install!

zukenutter wrote:
That's weird. Just saw your post on Big Jimny.
I'm going to have another try tomorrow


:) It's bugging the crap out of me how it worked yesterday, but not today :x On a positive note, i love having my hub's on a switch 8)

Author:  zukenutter [ Tue Mar 06, 2012 7:08 am ]
Post subject:  Re: ORA jimny conversion install!

monley wrote:
zukenutter wrote:
That's weird. Just saw your post on Big Jimny.
I'm going to have another try tomorrow


:) It's bugging the crap out of me how it worked yesterday, but not today :x On a positive note, i love having my hub's on a switch 8)


That's very cool. I'm tempted to switch back to SEMI-auto hubs :)

Author:  zukenutter [ Tue Mar 06, 2012 9:57 am ]
Post subject:  Re: ORA jimny conversion install!

I figured out the wiring today. I cut both the red/blue and the red/white under the dash at the AISIN controller. The wire stubs at the controller can be blanked off. The lights will now be off completely.
Join the two other ends of red/blue and the red/white together, join to a single wire and run to the transfer 4WD switch (under car). The other wire of the switch goes to earth.
Unfortunately the transfer switch is not two stage so 4LO and 4HI can't be differentiated. I chose to have 4LO light at the same time as 4. If you prefer just 4, leave red/white out of the join under dash.

Author:  monley [ Tue Mar 06, 2012 10:06 am ]
Post subject:  Re: ORA jimny conversion install!

Pics please?

Author:  zukenutter [ Tue Mar 06, 2012 10:12 am ]
Post subject:  Re: ORA jimny conversion install!

monley wrote:
Pics please?


OK, all done.

These two wires. Red/blue = 4WD, Red/white = LO. The two wires left dangling on the AISIN control module can be blanked off.

Image

I spliced both together so 4WD and LO both light at the same time even in high. If you don't want LO don't splice in the Red/white but you'll still need to cut it to stop it flashing.
Also in this pic you can see the earth wire running to the steering column bolt/nut. Used a dual wire connector just in case I want to easily disconnect.

Image

I ran dual core so the earth could be in the cab instead of more wires dangling underneath. passed it through the same grommet that the standard transfer wiring loom passed through at the rear of the handbrake.

Image

Finally tidied up the standard wiring loom

Image

Used a waterproof dual wire plug so I can easily disconnect when I need to remove the transfer case

Image

2WD and Neutral

Image

4WD Hi and Lo

Image

Author:  monley [ Tue Mar 06, 2012 7:38 pm ]
Post subject:  Re: ORA jimny conversion install!

Armsup Job for the weekend :)

Author:  zukenutter [ Tue Mar 06, 2012 9:10 pm ]
Post subject:  Re: ORA jimny conversion install!

monley wrote:
Armsup Job for the weekend :)


So nice not having that light flashing at me.

Author:  Ranga [ Fri Apr 20, 2012 10:56 am ]
Post subject:  Re: ORA jimny conversion install!

Sweeeet thread :D :cheers:

Author:  want33s [ Fri Apr 27, 2012 4:59 pm ]
Post subject:  Re: ORA jimny conversion install!

monley wrote:
Ok, i have wired my auto hubs into a switch on the dash. I can now turn them on and off when ever i need to. This allows for me to have 2wd low range with out getting out the car when wheeling 8)


Awesome write up... Well done. Armsup

Now that you have a Sierra transfer case you can select 2 low just in the transfer.

http://bbs.zuwharrie.com/content/topic, ... 49ed7f54d3

Page 1 of 4 All times are UTC + 9:30 hours
Powered by phpBB® Forum Software © phpBB Group
https://www.phpbb.com/