Board index » Talking About Stuff » I made it and fabrication
 
|
Page 1 of 1
|
[ 19 posts ] |
|
Print view
Previous topic | Next topic
| Author |
Message |
mike.knew

az supporter


Joined: Sun Nov 16, 2008 10:30 pm Posts: 201 Location: Port Macquarie
Vehicle: SV420

|
 Posted: Fri Jan 15, 2010 1:03 am |
|
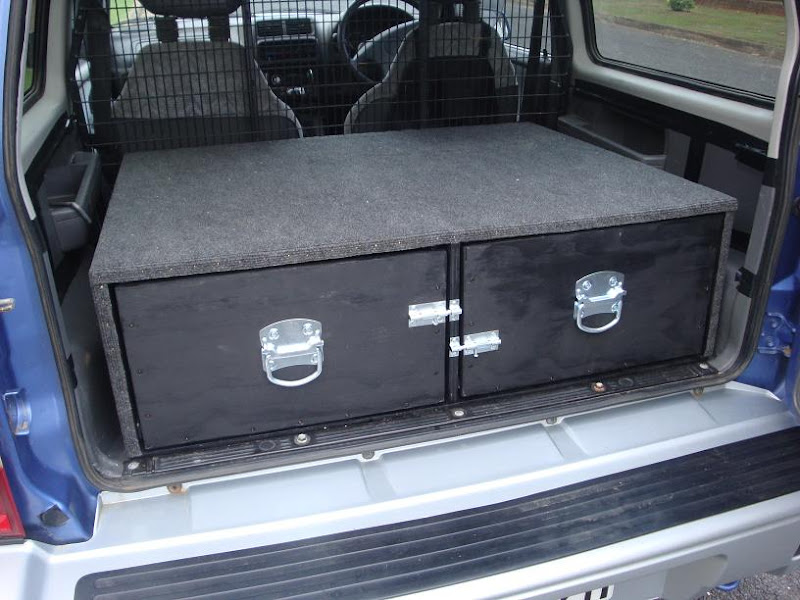
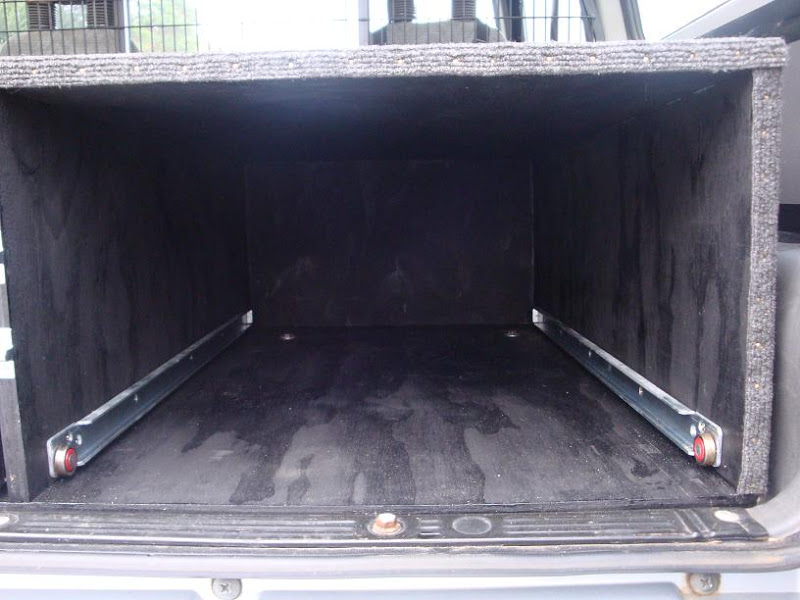
I have been wanting a set of rear drawers for quiet a while as I have been doing a bit of camping and aiming for an easier way to pack and unpack. After doing a bit of researching, surfing and asking a few questions I came with these.
First off I grab two sets of runners off the bay, the same as these 4WD Drawer Runners/Fridge Slides H/Duty 700mm 100kg
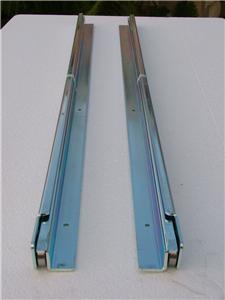
Paid $85 each and are heavy duty ... and heavy 
Off to bunnings and bought three sheets of structural grade 15mm ply at $55 a sheet plus 100 wood screws 40 mm long.
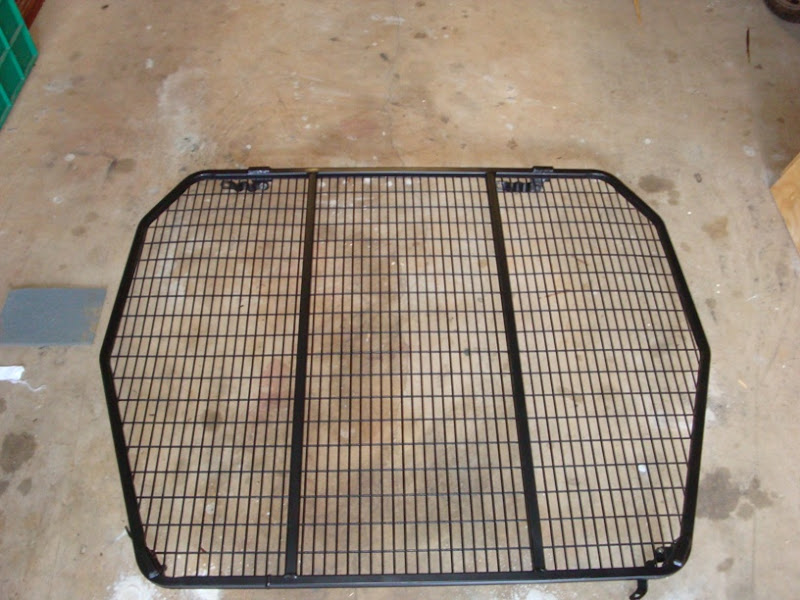
Clearing the back of the buzz removing what ever was left of the rear seats, took the cargo barrier out, and a quick lick of paint:
Put some tape over the edges of the plastics to try and keep the dust out:
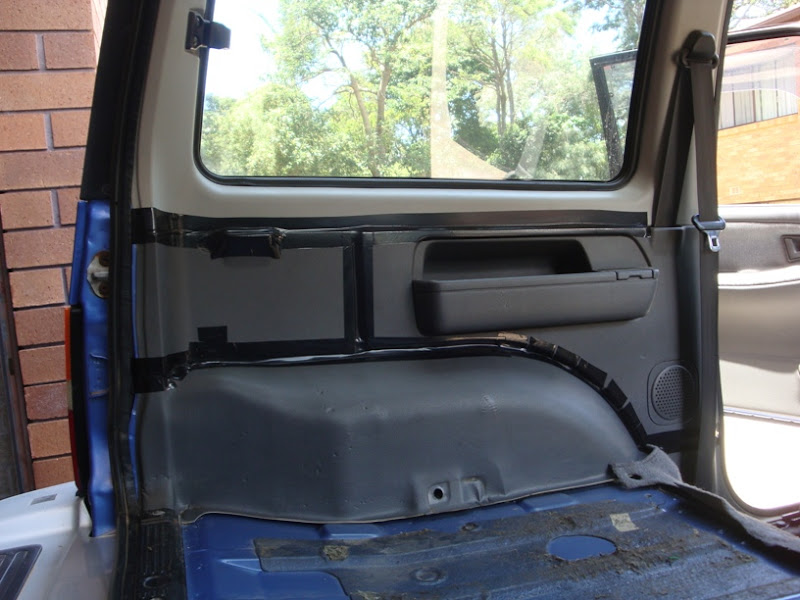
the tape is starting to lift in some places so I am not sure if it is going to stay. I had tried tape under the plastics and pierce a spot for the clips ... better but not 100% so I thought I would try this method. See how it goes 
After a bit of scratching I decided to keep it simple and make it a box with no fancy angles 'cos there are just so many options and this was my first go at something like this. I may have to revisit here with some packing later but lets get started.
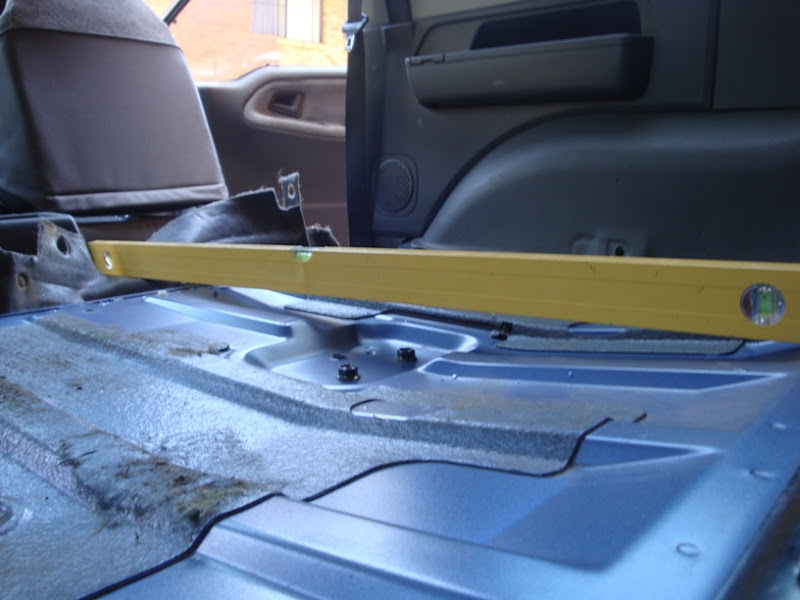
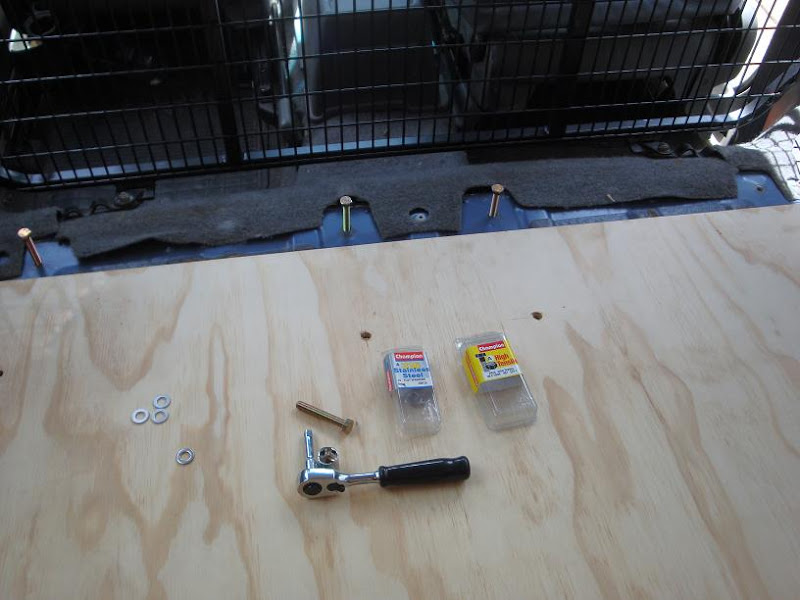
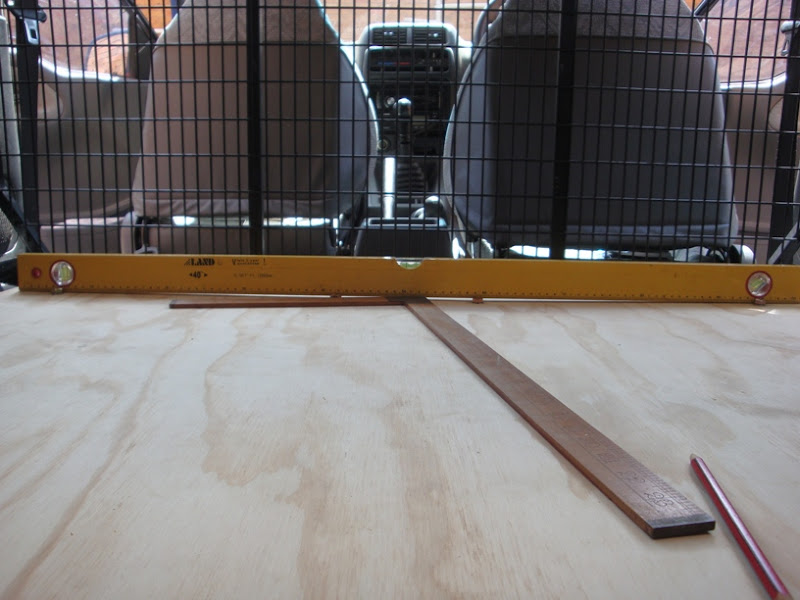
First sheet cut 1040 mm wide and 800 long. I am going to use the insert used to original hold in the rears seats, four holes drilled and some bolts from super crap I had my base down:
First fit and there is a dip in the middle:
So I packed it up a bit to help keep it square:

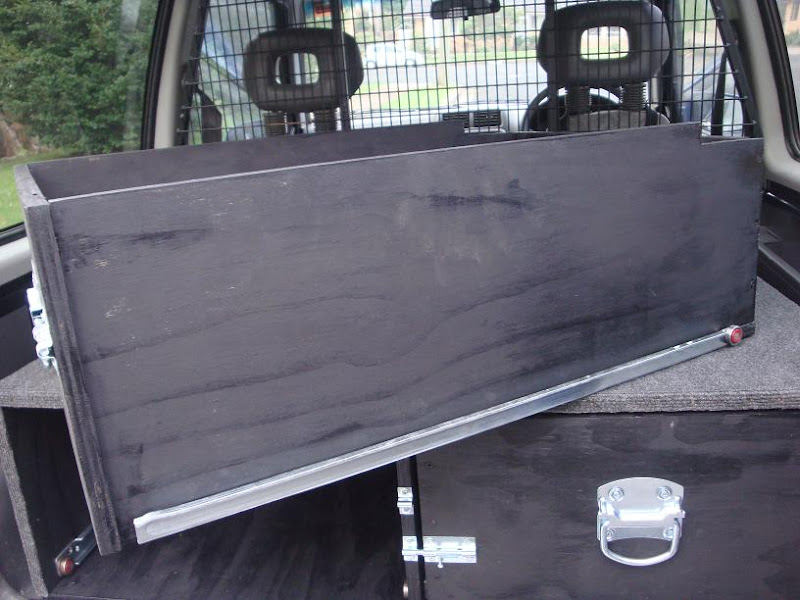
I decide the right height to suit what I was after was an overall height of 265mm. Taking into consideration the thickness of the ply around the base and top (and the back) I cut up the sides, middle and back for my drawers frame. Drilling holes first (50 mm in from the corner and then every 100 mm) in the sheet, I screwed it together whilst trying my best to keep everything square :
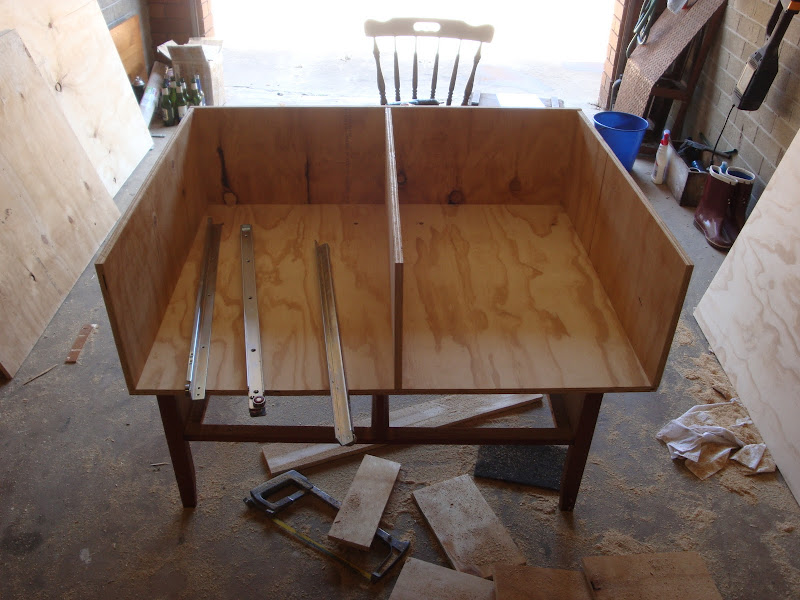
Only putting in a couple of temporary screws I mounted the runners (packed underneath so I don't fowl on my mounting bolts) and came up the lengths for the base of the drawers themselves of 466 mm wide and 765 long (I wanted a bit of space at the back incase I wanted to the front of the draws recessed later on). A height of 265 also gave a bit of extra space at the top.

By now the garage is a mess so I cut the top (same measurements as the base)
and screwed it all together and finally squared the hole lot off with a belt sander. i have to take a bit out of the back of the draws so I could pull them out 
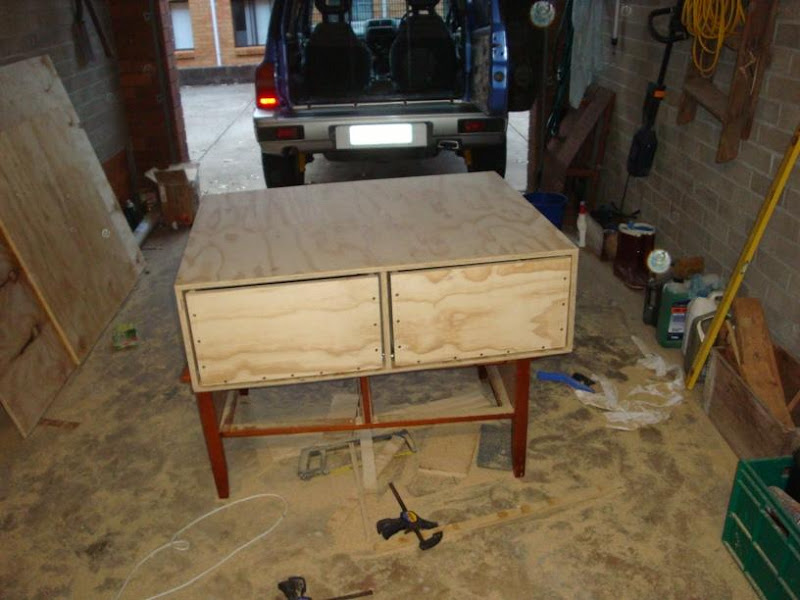
I then pulled the draws and the base apart, one section of a time and used exterior proof wood glue and rescrewed back together leaving the top off so I could paint. it all Around $15 for a 1 ltr can of back paint (and used most of it). Then glued the top on and a second lick of paint to touch up the rough parts:
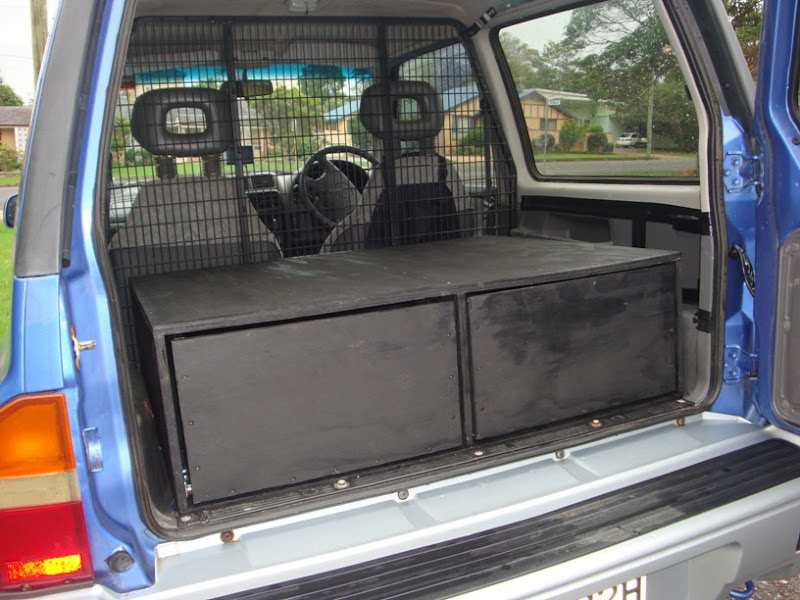
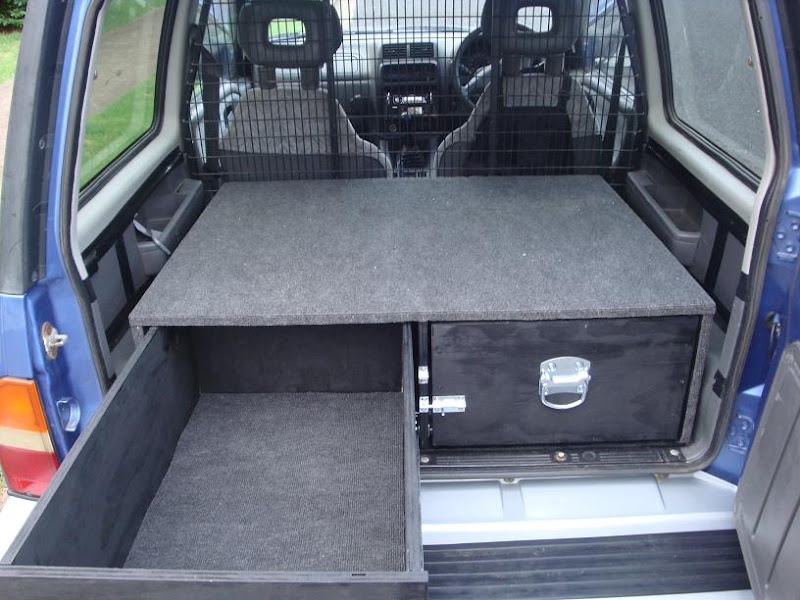
Then off to Clark Rubbers and bought 2 meters of exterior carpet at $22 a meter (its 2 meters wide) and 500 ml of contact adhesive (could of use twice that much) I covered the drawers overturning the edges and pining the edges with nails. Some locks and handles from bunnings and job is done:
I still have enough ply to make a rear shelf along the rear gate (and I think enough to go towards the second work bench I have planned) and carpet to cover. I am just tosing up if I want a full length bench along the bottom (but won't be able to get into the draws at all when down), a half length bench or a full length bench but runs along the top of the trim?

I'll work something out and it will be just how I want it 
Hope you enjoy 
|
|
|
|
|
Joe
I live here!


Joined: Sat Jul 04, 2009 11:30 pm Posts: 49041 Location: Rockingham W.A
Vehicle: JB74
|
Posted: Fri Jan 15, 2010 1:09 am |
|
Well done matey  
_________________
Joe likes boobs ( . )( . ) ( ° )( ° )
|
|
|
|
|
brendan
Joined: Sun Jul 27, 2008 11:30 pm Posts: 1484 Location: Sydney
|
Posted: Fri Jan 15, 2010 1:15 am |
|
|
fucken looks sick. good work, now fill them draws up. got any plans for a fridge up top?
_________________
navara on 33s. hopfully rear air locker soon
|
|
|
|
|
mike.knew
az supporter
Joined: Sun Nov 16, 2008 10:30 pm Posts: 201 Location: Port Macquarie
Vehicle: SV420
|
Posted: Fri Jan 15, 2010 1:31 am |
|
joseph wrote: Well done matey cheers bud  brendan wrote: fucken looks sick. good work, now fill them draws up. got any plans for a fridge up top?
I would really like to. I have some roof racks to mount - hopefully on the weekend I'll get that out of the way. Then have bit of a scratch on the ol' nogin' and figure how the best way to mount dual batteries, hopefully both under the bonnet 
A mate at work has a fridge I can borrow any time I want so if I use it enough I'll get one. ATM I am just using an ice box esky but I am getting over the ice thing 
|
|
|
|
|
atari4x4
az supporter

Joined: Mon Dec 11, 2006 10:30 pm Posts: 34843 Location: East Radelayed
Vehicle: SV420+SV620 Vitara's
|
Posted: Fri Jan 15, 2010 1:32 am |
|
|
nice work mike, i'll be stealing your idea shortly!
_________________
You're just hating because you don't understand
|
|
|
|
|
jimbo_jones
az supporter
Joined: Sat Jul 19, 2008 11:30 pm Posts: 4361 Location: gong
Vehicle: 2015 Jimny, LJ50, Maruti
|
Posted: Fri Jan 15, 2010 1:35 am |
|
|
good job I got the same runners on my draws there not bad
|
|
|
|
|
gregt

Joined: Wed Apr 09, 2008 11:30 pm Posts: 117 Location: umina
|
Posted: Fri Jan 15, 2010 1:39 am |
|
|
|
|
Rusho
Tubby Elfsdong

Joined: Sun Aug 02, 2009 11:30 pm Posts: 6501 Location: Northside, Brisbane
Vehicle: Coily Sierra
|
Posted: Fri Jan 15, 2010 1:45 am |
|
|
Really tidy mate. Good job
_________________
Shep is a closet jimny lover!!!!
|
|
|
|
|
mike.knew
az supporter
Joined: Sun Nov 16, 2008 10:30 pm Posts: 201 Location: Port Macquarie
Vehicle: SV420
|
Posted: Fri Jan 15, 2010 1:55 am |
|
atari4x4 wrote: nice work mike, i'll be stealing your idea shortly! Thanks Atari. They do have a bit of weight in them but I wouldn't go any thinner than 15mm especially if you are going to butt join the edges like I have. You also have to off set one side of the runners to the others otherwise you will be trying to screw a screw in the center piece of the frame - if that makes sense? I am kinda guilty of steeling ideas off your vit jimbo_jones wrote: good job I got the same runners on my draws there not bad I am happy with them. When I first started using my drawers I even said to my gf "I am going to have to put a stop in these draws to keep them open" - only later did I realise you can lift them into a notch to keep them open  gregt wrote: Nice work Thanks Rusho81 wrote: Really tidy mate. Good job
Thanks, I am proud for a first go
|
|
|
|
|
Westie
az supporter

Joined: Tue Jul 04, 2006 11:30 pm Posts: 1417 Location: Caloundra Sunshine
|
Posted: Fri Jan 15, 2010 2:30 am |
|
|
Looks good hope the runners are heavey enough when you fill those draws with recovery gear and tools Etc. They add a lot of weight
_________________
Steve W
Old guy .... Just wants to go 4WDing with
|
|
|
|
|
BUZOOKA
az supporter

Joined: Sun Aug 30, 2009 11:30 pm Posts: 2659 Location: hobart tasmania
|
Posted: Fri Jan 15, 2010 3:28 am |
|
|
wats the weight like with the 15mm ply
as my pops pretty handy with wood and offered to help me with mine
cheerz zooka
_________________
-indebt 4x4 club-
nav 32s n winch cust rear
|
|
|
|
|
v.w.dave
Joined: Sun Sep 27, 2009 11:30 pm Posts: 1437 Location: The Hills Sydney
|
Posted: Fri Jan 15, 2010 4:12 am |
|
|
Very nice. A guy I usetoo wheel with had close to the same thing, the areas above the wheel arches on one side he put a lid with hinges and he used that area to keep his snatch strap and some tools on one side and on the other side he kept a shortend highjack lift. It kept some of the weight out of the drawers and made good use of that dead space. just an idea for you.
_________________
Snap-On Dealer let me know if you need anything.
|
|
|
|
|
Stuey
az supporter
Joined: Sat Feb 02, 2008 10:30 pm Posts: 621 Location: Perth, WA
Vehicle: 97 SV420/627 SWB Vitara
|
Posted: Fri Jan 15, 2010 5:48 am |
|
|
Looking good Mike. Drawers are on my to do list as well very shortly (need to be done before June when I head North for a month). Yours turned out great.
Good luck with the dual batteries! I've been scratching my head over that one for quite some time now. Now that the ARB compressor is in, there is even less room/options as you know.
_________________
Lifted, Locked & Loud. Expensive Little Toy...
|
|
|
|
|
S13RR4

Joined: Sat Aug 22, 2009 11:30 pm Posts: 1072 Location: Sunshine Coast
|
Posted: Fri Jan 15, 2010 6:30 am |
|
|
Nice write up mate, real nice job of the drawers too
_________________
My Rig --> Click WWW
|
|
|
|
|
MacDaddy
az supporter
Joined: Thu Mar 26, 2009 10:30 pm Posts: 10453 Location: Perth, Australia
Vehicle: Jeep
|
Posted: Fri Jan 15, 2010 8:06 am |
|
Hi, Nice work but wow that must add alot of weight using 15mm ply...
Something similar is on my to do list as well... but i shall be doing a few things different, i shall be keeping one rear seat behind the driver, it always comes in handy to have an extra seat.
And then just have one side as a cupboard, not a draw, the top will lift up, and the front will fold down, like a table, i shall be using rubber strip to help seal it, and to stop squeaks and rattles, and to keep weight to a minimum i shall use a aluminium angle frame 20mm x 1.5mm, then screw/bolt the plywood to that, 5ply 7mm will be plenty thick enough
As for dual battery, i was thinking of getting a good med size battery 9 or 11 plate, and hooking it up to a solar panel that will permanently sit on the roof, got a 5watt one from BCF for $60, and it can withstand up to 25mm hail stones and is UV resistant, then i can use that for added accessories, and in case my main battery goes flat, i will just use jumper cables, i would like to get one of those sealed marine battery boxes, if not to expensive, and bolt it behind the rear seat... these are just some of my idea's, but once my Vit has had the smash repairs done, and some more important mechanical repairs done, i shall be doing the cupboard next !
|
|
|
|
|
mike.knew
az supporter
Joined: Sun Nov 16, 2008 10:30 pm Posts: 201 Location: Port Macquarie
Vehicle: SV420
|
Posted: Tue Jan 19, 2010 4:33 am |
|
Westie wrote: Looks good hope the runners are heavey enough when you fill those draws with recovery gear and tools Etc. They add a lot of weight 100kg the runners are suppose to be rated at - although I see no AS standard stamp on 'em BUZOOKA wrote: wats the weight like with the 15mm ply
as my pops pretty handy with wood and offered to help me with mine
cheerz zooka I should of weight them as it seems to be a common question  I have probably use two full shets of ply plus the runners gives you an idea of the sort of weight. It is a good fun project that will keep you busy for a while v.w.dave wrote: Very nice. A guy I usetoo wheel with had close to the same thing, the areas above the wheel arches on one side he put a lid with hinges and he used that area to keep his snatch strap and some tools on one side and on the other side he kept a shortend highjack lift. It kept some of the weight out of the drawers and made good use of that dead space. just an idea for you. I will use that. In the second and third photos you can see the pockets for the rear - these screw on to the trim so I am going to take these off next time I the back is in pieces so I can fit more stuff over the wheel arches like you have said. Stuey wrote: Looking good Mike. Drawers are on my to do list as well very shortly (need to be done before June when I head North for a month). Yours turned out great.
Good luck with the dual batteries! I've been scratching my head over that one for quite some time now. Now that the ARB compressor is in, there is even less room/options as you know. Thanks Stuey. I use them all of the time, even just somehwere to put the groceries in, stuff from bunnings - just anything that'll fit. I used them for the first time on the weekend and even though it was just a day trip - packing and unpacking the car was easy Where are you heading? Kimbery? I am heading dow to Tas for 3 weeks in March so getting ready for that. Yeah matey I know exactly where your head is at - same place as mine  I wish the wiper motor was on the otherside Or strut tower was more forward and then you may be able to fit two batteries side by side if you turned the original one 90 degress. I wonder it you could fit a gel cell on the front left hand side if the radiator overflow and wiper bottle was moved? GF's brother works at a battery shop 40 minutes away so I am thinking of going up there on the weekend and see what they have. I must like looking under the bonet as I just get lost in there S13RR4 wrote: Nice write up mate, real nice job of the drawers too Thanks S13RR4. MacBear wrote: Hi, Nice work but wow that must add alot of weight using 15mm ply... Something similar is on my to do list as well... but i shall be doing a few things different, i shall be keeping one rear seat behind the driver, it always comes in handy to have an extra seat. And then just have one side as a cupboard, not a draw, the top will lift up, and the front will fold down, like a table, i shall be using rubber strip to help seal it, and to stop squeaks and rattles, and to keep weight to a minimum i shall use a aluminium angle frame 20mm x 1.5mm, then screw/bolt the plywood to that, 5ply 7mm will be plenty thick enough I know the setup you are thinking and that sounds really good, just depends what you are after and a rear seat wasn't on my list. You would have space behind the rear set for a esky and as long as you don't pack on top of it you can still access it no probs. Another option I was thinking about was put a shelf across the back re-enforced with aluminum and just use plastic draws/tubs underneath as I don't need any seats in the back. MacBear wrote: As for dual battery, i was thinking of getting a good med size battery 9 or 11 plate, and hooking it up to a solar panel that will permanently sit on the roof, got a 5watt one from BCF for $60, and it can withstand up to 25mm hail stones and is UV resistant, then i can use that for added accessories, and in case my main battery goes flat, i will just use jumper cables, i would like to get one of those sealed marine battery boxes, if not to expensive, and bolt it behind the rear seat... these are just some of my idea's, but once my Vit has had the smash repairs done, and some more important mechanical repairs done, i shall be doing the cupboard next ! I was just looking at the space between my center console and cage but I really don't want it inside the car as you are loosing premium space inside plus a sealed battery is the only way to go inside the car IMO. Its not ruled out though.
|
|
|
|
|
MacDaddy
az supporter
Joined: Thu Mar 26, 2009 10:30 pm Posts: 10453 Location: Perth, Australia
Vehicle: Jeep
|
Posted: Tue Jan 19, 2010 7:15 am |
|
Quote: MacBear wrote: Hi, Nice work but wow that must add alot of weight using 15mm ply... Something similar is on my to do list as well... but i shall be doing a few things different, i shall be keeping one rear seat behind the driver, it always comes in handy to have an extra seat. And then just have one side as a cupboard, not a draw, the top will lift up, and the front will fold down, like a table, i shall be using rubber strip to help seal it, and to stop squeaks and rattles, and to keep weight to a minimum i shall use a aluminium angle frame 20mm x 1.5mm, then screw/bolt the plywood to that, 5ply 7mm will be plenty thick enough I know the setup you are thinking and that sounds really good, just depends what you are after and a rear seat wasn't on my list. You would have space behind the rear set for a esky and as long as you don't pack on top of it you can still access it no probs. Another option I was thinking about was put a shelf across the back re-enforced with aluminum and just use plastic draws/tubs underneath as I don't need any seats in the back. MacBear wrote: As for dual battery, i was thinking of getting a good med size battery 9 or 11 plate, and hooking it up to a solar panel that will permanently sit on the roof, got a 5watt one from BCF for $60, and it can withstand up to 25mm hail stones and is UV resistant, then i can use that for added accessories, and in case my main battery goes flat, i will just use jumper cables, i would like to get one of those sealed marine battery boxes, if not to expensive, and bolt it behind the rear seat... these are just some of my idea's, but once my Vit has had the smash repairs done, and some more important mechanical repairs done, i shall be doing the cupboard next ! I was just looking at the space between my center console and cage but I really don't want it inside the car as you are loosing premium space inside plus a sealed battery is the only way to go inside the car IMO. Its not ruled out though. I was thinking of building an esky into the rear cupboard, so it sits behind the front passenger seat, i was gonna pull an old esky apart, add some extra polystyrene insulation around the esky liner, for extra insulation, then make the old esky liner slide in and out of the polystyrene, so it can be emptied and washed, then fill the old plastic esky lid with that 2 pack
expanding foam, again for extra insulation, then just have an occy strap or velcro to hold the lid on...
Another thought for the dual battery, is what i have seen on some 4WD's, they have like an extended Bull Bar, it sits out another 6 inches from the front of the car, then the other battery is bolted onto the Bull Bar... as i am not sure i would want another battery under the bonnet sitting above the exhaust manifold, its too hot, would make me feel uneasy, lol...
Yeah if the battery was inside the car it would have to sealed for sure... another spot for the battery would be behind the passenger seat, in the foot well, it would keep the weight low, it would be out of the way, would just need to make up a box for it...
All these idea's...

|
|
|
|
|
vermin
az supporter
Joined: Mon Nov 02, 2009 10:30 pm Posts: 1441 Location: Clarkson W.A.
|
Posted: Wed Mar 24, 2010 7:50 pm |
|
|
Is this permanent? I mean can it all be pulled out and the seats back in quickly??
_________________
09 Jimny Sierra Limited Edition
|
|
|
|
|
whincup
az supporter

Joined: Sat Apr 17, 2010 11:30 pm Posts: 1588 Location: Gracemere, QLD
Vehicle: '94 suzuki maruti
|
Posted: Thu Apr 22, 2010 5:16 pm |
|
|
wow... looking at these pics has made me want to do something similar... even started drawing up sketches... just a quick question, what timber did you use?
|
|
|
|
|
|
|
|
Page 1 of 1
|
[ 19 posts ] |
|
Who is online
Users browsing this forum: No registered users and 882 guests
You cannot post new topics in this forum
You cannot reply to topics in this forum
You cannot edit your posts in this forum
You cannot delete your posts in this forum
You cannot post attachments in this forum
|
Untitled Document
Untitled Document
|
