| Author |
Message |
jim_dover

az supporter

Joined: Fri Sep 11, 2009 11:30 pm Posts: 286 Location: Brisbane
Vehicle: '84 LWB 1LTR

|
 Posted: Sat Nov 24, 2012 6:58 am |
|
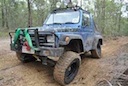
Knocked this up last night at work. I'm fitting a SV620 fuel tank into the back end of my LWB so after going to all the effort of fitting the tank I thought i'd vetter protect it. Still gotta weld it up test fitted this morning and there is a 10mm gap between the bottom of the tank and the guard so hopefully works well. Its made out of 3mm mild. PS. Sorry Fatzook I mostly stole the Suzi 's' idea off you.   
|
|
|
|
|
larry
Joined: Wed Sep 08, 2010 3:15 am Posts: 657 Location: penrith, NSW
|
Posted: Sat Nov 24, 2012 7:45 am |
|
|
|
|
Zook_Fan
az supporter
Joined: Thu Mar 13, 2008 10:30 pm Posts: 4530 Location: Toowoomba
Vehicle: Maruti and LJ80's
|
Posted: Sat Nov 24, 2012 8:03 am |
|
|
Looks good but was it really that heavy you had to cut wholes in the bottom? It will have sort of like a cheese grater effect now instead of a nice smooth surface to slide over.
|
|
|
|
|
jim_dover
az supporter
Joined: Fri Sep 11, 2009 11:30 pm Posts: 286 Location: Brisbane
Vehicle: '84 LWB 1LTR
|
Posted: Sat Nov 24, 2012 8:42 am |
|
|
Cheers guys.
Nah not heavy at all maybe 8kgs. Holes are there to drain water and what not out. Its up pretty high and close to the rear diff so hopefully shouldn't change how it slides over anything. But if it does at least its the guard and not my fuel tank haha
|
|
|
|
|
Fatzook
az supporter

Joined: Sat Oct 27, 2007 11:30 pm Posts: 14977 Location: The Hills
Vehicle: Vitara, NGV
|
Posted: Sat Nov 24, 2012 11:48 am |
|
|
looks good.
What are you doing to mount it to the tank/ frame?
_________________
2013 GV
1998 SV420 ute
|
|
|
|
|
jim_dover
az supporter
Joined: Fri Sep 11, 2009 11:30 pm Posts: 286 Location: Brisbane
Vehicle: '84 LWB 1LTR
|
Posted: Sat Nov 24, 2012 12:11 pm |
|
Fatzook wrote: looks good.
What are you doing to mount it to the tank/ frame? Yeah cheers Pete. I'm more then happy with the result  There a two 40mm lips to be welded and gusseted on yet. Front and back and they'll use the same mounting points as the tank. As for the mounting points on the chassis I had to cut out the factory cross member and using a length of rhs at the back and maybe even the front yet to get the required width for the tank. Once I'm happy with a location (making sure its not to far forward or backwards) I am going to mark where the factory filler neck meets the guard and tank. And relocate the fuel tanks filler hole.
|
|
|
|
|
Fatzook
az supporter
Joined: Sat Oct 27, 2007 11:30 pm Posts: 14977 Location: The Hills
Vehicle: Vitara, NGV
|
Posted: Sat Nov 24, 2012 12:33 pm |
|
|
MIG or TIG welding it?
_________________
2013 GV
1998 SV420 ute
|
|
|
|
|
jim_dover
az supporter
Joined: Fri Sep 11, 2009 11:30 pm Posts: 286 Location: Brisbane
Vehicle: '84 LWB 1LTR
|
Posted: Sat Nov 24, 2012 1:01 pm |
|
|
The tank is being TIG I believe my mates a boiler maker and i designated him to do it lol. But the guard is being MIG welded.
Why is that?
|
|
|
|
|
Fatzook
az supporter
Joined: Sat Oct 27, 2007 11:30 pm Posts: 14977 Location: The Hills
Vehicle: Vitara, NGV
|
Posted: Sat Nov 24, 2012 1:35 pm |
|
|
Just curious. Thats alot of welding is all, so make sure you take it easy.
_________________
2013 GV
1998 SV420 ute
|
|
|
|
|
jim_dover
az supporter
Joined: Fri Sep 11, 2009 11:30 pm Posts: 286 Location: Brisbane
Vehicle: '84 LWB 1LTR
|
Posted: Sat Nov 24, 2012 1:42 pm |
|
|
Ohh ok I'm with yah. Yeah ideally it would have been folded and stitched in the corners only but I don't have the facilities to do so. When I weld it up fully i'll be sure to brace it and avoid big runs so it doesn't warp.
|
|
|
|
|
Fatzook
az supporter
Joined: Sat Oct 27, 2007 11:30 pm Posts: 14977 Location: The Hills
Vehicle: Vitara, NGV
|
Posted: Sat Nov 24, 2012 1:45 pm |
|
|
Tack it to a bench in all 4 corners before you weld it. Let it cool down before breaking the tacks.
_________________
2013 GV
1998 SV420 ute
|
|
|
|
|
jim_dover
az supporter
Joined: Fri Sep 11, 2009 11:30 pm Posts: 286 Location: Brisbane
Vehicle: '84 LWB 1LTR
|
Posted: Sat Nov 24, 2012 1:53 pm |
|
Alright will do thanks for the advice  It was going to end poorly otherwise haha
|
|
|
|
|
Fatzook
az supporter
Joined: Sat Oct 27, 2007 11:30 pm Posts: 14977 Location: The Hills
Vehicle: Vitara, NGV
|
Posted: Sat Nov 24, 2012 4:19 pm |
|
jim_dover wrote: Alright will do thanks for the advice It was going to end poorly otherwise haha If you need a hand let me know.
_________________
2013 GV
1998 SV420 ute
|
|
|
|
|
TZAR
az supporter

Joined: Tue Aug 01, 2006 11:30 pm Posts: 3459 Location: licking some windows
Vehicle: LJ20 LJ50
|
Posted: Sat Nov 24, 2012 5:48 pm |
|
|
Just an idea but maybe you should cut some holes in the corners. Cause when you get mud in between the tank and guard how will you get it out??? If you have holes in the corner you can just put the hose in and wash it out
_________________
Camels have nice toes
|
|
|
|
|
jim_dover
az supporter
Joined: Fri Sep 11, 2009 11:30 pm Posts: 286 Location: Brisbane
Vehicle: '84 LWB 1LTR
|
Posted: Sat Nov 24, 2012 6:09 pm |
|
Fatzook wrote: jim_dover wrote: Alright will do thanks for the advice It was going to end poorly otherwise haha If you need a hand let me know. Cheers mate will do. TZAR wrote: Just an idea but maybe you should cut some holes in the corners. Cause when you get mud in between the tank and guard how will you get it out??? If you have holes in the corner you can just put the hose in and wash it out Already done  the diff side of the guard has a 90mm gap the width of the tank for flushing it out. Cheers anyway
|
|
|
|
|
Trypt

Joined: Tue Apr 17, 2012 11:19 am Posts: 492
Vehicle: 1.3 Tin Top
|
Posted: Sun Nov 25, 2012 10:52 am |
|
|
|
|
hooki
az supporter

Joined: Mon Jul 21, 2008 11:30 pm Posts: 1785 Location: perth, WA
Vehicle: 85' LWB Sierra, 01' S15
|
Posted: Sun Dec 02, 2012 2:25 am |
|
awesome work mate 
|
|
|
|
|
jim_dover
az supporter
Joined: Fri Sep 11, 2009 11:30 pm Posts: 286 Location: Brisbane
Vehicle: '84 LWB 1LTR
|
Posted: Sat Dec 08, 2012 4:12 am |
|
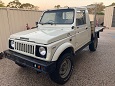
Thanks guys. Finally got around to fitting the tank and painting up the gaurd. Only have photos of it painted not of it installed i'll grab some in the next few days.   
|
|
|
|
|
jim_dover
az supporter
Joined: Fri Sep 11, 2009 11:30 pm Posts: 286 Location: Brisbane
Vehicle: '84 LWB 1LTR
|
Posted: Sat Dec 08, 2012 4:15 am |
|
|
Still have to mark and plumb into the factory filler neck though but shouldn't take much ended up sitting about 60mm lower then a standard tank and with about 15-20ltrs or so of added fuel I think its worth the sacrifice.
|
|
|
|
|
Fatzook
az supporter
Joined: Sat Oct 27, 2007 11:30 pm Posts: 14977 Location: The Hills
Vehicle: Vitara, NGV
|
Posted: Sat Dec 08, 2012 10:06 am |
|
|
That turned out great!!
_________________
2013 GV
1998 SV420 ute
|
|
|
|
|
jim_dover
az supporter
Joined: Fri Sep 11, 2009 11:30 pm Posts: 286 Location: Brisbane
Vehicle: '84 LWB 1LTR
|
Posted: Fri Dec 14, 2012 11:30 pm |
|
Thanks mate. I'm pretty happy with the results. Espically since all up including the tank, steel plate (cut at work), rhs and bolts. Cost just over $140. Slapped a new EFI pump in for $90 and all sorted. Mounting it up this Tuesday just had to make a new rear cross memeber maybe a bit of over kill but hay do it right once and forget about it. Heres the new rear cross member the notches at the ends will sit up against the bottom of the chassis rail. At this point looks like the front mounting points will come close to lining up  
|
|
|
|
|
jim_dover
az supporter
Joined: Fri Sep 11, 2009 11:30 pm Posts: 286 Location: Brisbane
Vehicle: '84 LWB 1LTR
|
Posted: Fri Dec 14, 2012 11:39 pm |
|
Also the tank as standard I believe is a 65ltr now it had to be bashed in the sides the smallest amount (about 10-15mm a side) to fit between the chassis rails. So probably looking around the 58-61 litre mark being very conservative. If I was running body lift plumbing this into the factory filler neck would be VERY easy. Just in case anyone was thinking about this tank to use when doing an EFI motor upgrade. And with body lift the tank could sit a lot higher and the added capacity will be worth it once she is done Thanks for all the positive feed back guys
|
|
|
|
|
Fatzook
az supporter
Joined: Sat Oct 27, 2007 11:30 pm Posts: 14977 Location: The Hills
Vehicle: Vitara, NGV
|
Posted: Sat Dec 15, 2012 6:41 pm |
|
SV tanks are 70 litres 
_________________
2013 GV
1998 SV420 ute
|
|
|
|
|
jim_dover
az supporter
Joined: Fri Sep 11, 2009 11:30 pm Posts: 286 Location: Brisbane
Vehicle: '84 LWB 1LTR
|
Posted: Mon Dec 17, 2012 10:55 pm |
|
Fatzook wrote: SV tanks are 70 litres Ohh really great even better then I thought
|
|
|
|
|
honks
Joined: Tue Apr 20, 2010 11:30 pm Posts: 214 Location: ipswich
|
Posted: Mon Feb 11, 2013 3:52 pm |
|
|
Looks great, and that paint looks pretty flash too
|
|
|
|
|
jonno_racing
az supporter
Joined: Wed Apr 15, 2009 11:30 pm Posts: 8164 Location: Tassie
Vehicle: suzuki
|
Posted: Sat Feb 16, 2013 4:55 pm |
|
|
|
|
Fatzook
az supporter
Joined: Sat Oct 27, 2007 11:30 pm Posts: 14977 Location: The Hills
Vehicle: Vitara, NGV
|
Posted: Sun Feb 17, 2013 2:04 pm |
|
jonno_racing wrote: Mint cammo job Agreed. Should spray the whole car like that 
_________________
2013 GV
1998 SV420 ute
|
|
|
|
|
jonno_racing
az supporter
Joined: Wed Apr 15, 2009 11:30 pm Posts: 8164 Location: Tassie
Vehicle: suzuki
|
Posted: Sun Feb 17, 2013 2:51 pm |
|
Fatzook wrote: jonno_racing wrote: Mint cammo job Agreed. Should spray the whole car like that i am doing my bar work/tray on my lwb in cammo, was going to be black, but black is a bit boring! This is my toolbox i did ages ago, the cammo is a bit to tight, but in better light it looks the goods! I used a furn for this one! same method i use for my nerf guns.  Sorry for the hijack! _________________ Do cool stuff, Put it on the internet Sierra build, Jimny build https://www.youtube.com/user/redzook1
|
|
|
|
|
Fatzook
az supporter
Joined: Sat Oct 27, 2007 11:30 pm Posts: 14977 Location: The Hills
Vehicle: Vitara, NGV
|
Posted: Sun Feb 17, 2013 6:09 pm |
|
Highjack cont. Why haven't you painted richie the same way? Would hide the battle scars a bit better 
_________________
2013 GV
1998 SV420 ute
|
|
|
|
|
jonno_racing
az supporter
Joined: Wed Apr 15, 2009 11:30 pm Posts: 8164 Location: Tassie
Vehicle: suzuki
|
Posted: Mon Feb 18, 2013 8:29 am |
|
Fatzook wrote: Highjack cont. Why haven't you painted richie the same way? Would hide the battle scars a bit better then i would loose him in the bush! nah its a whole lot of time and effort! i plan on keeping my LWB for a long time so will be worth it! haven't ever done it with a spray gun but should be a fair bit easier with adjustable paint flow. i was thinking of doing all the bolt on bits, like door hinges, bar work, outside tube of rear tray etc in a black based cammo and the cab Burnt orange. well that's the plan. _________________ Do cool stuff, Put it on the internet Sierra build, Jimny build https://www.youtube.com/user/redzook1
|
|
|
|
|
|


